Guide · Messenger · Model A
Create your own Meta App and connect Messenger
Complete guide to obtaining your credentials · ~30 minutes · No prior experience
What you'll achieve: create your application in Meta for Developers, link your Facebook Page, and get the 3 values that any messaging platform needs to connect your Messenger:App Secret, Page Access Token andPage ID.
What you need before you start:
- A personal Facebook account.
- A Facebook Page for your business, where your account is afull-access administrator.
- A desktop browser (not mobile) withpopups allowed for facebook.com.
Guide index
- 1 · Create your App
- 2 · Link your Page
- 3 · Your 3 credentials
- 4 · The webhook
- 5 · Test and go public
- The finish: your bot replying
- 1-minute summary
- #1 · Nothing happens on Connect
- #2 · My Page doesn't show up
- #3 · Is it the right token?
- #4 · The button goes to WhatsApp
- #5 · 30+ boxes with no explanation
- #6 · Webhook subscription failed
- #7 · Receives but doesn't reply
Part 1 · Create your App (one time only)
1.1 Go to the developer portal
Go to https://developers.facebook.com and sign in with your Facebook account (the one that manages your Page).
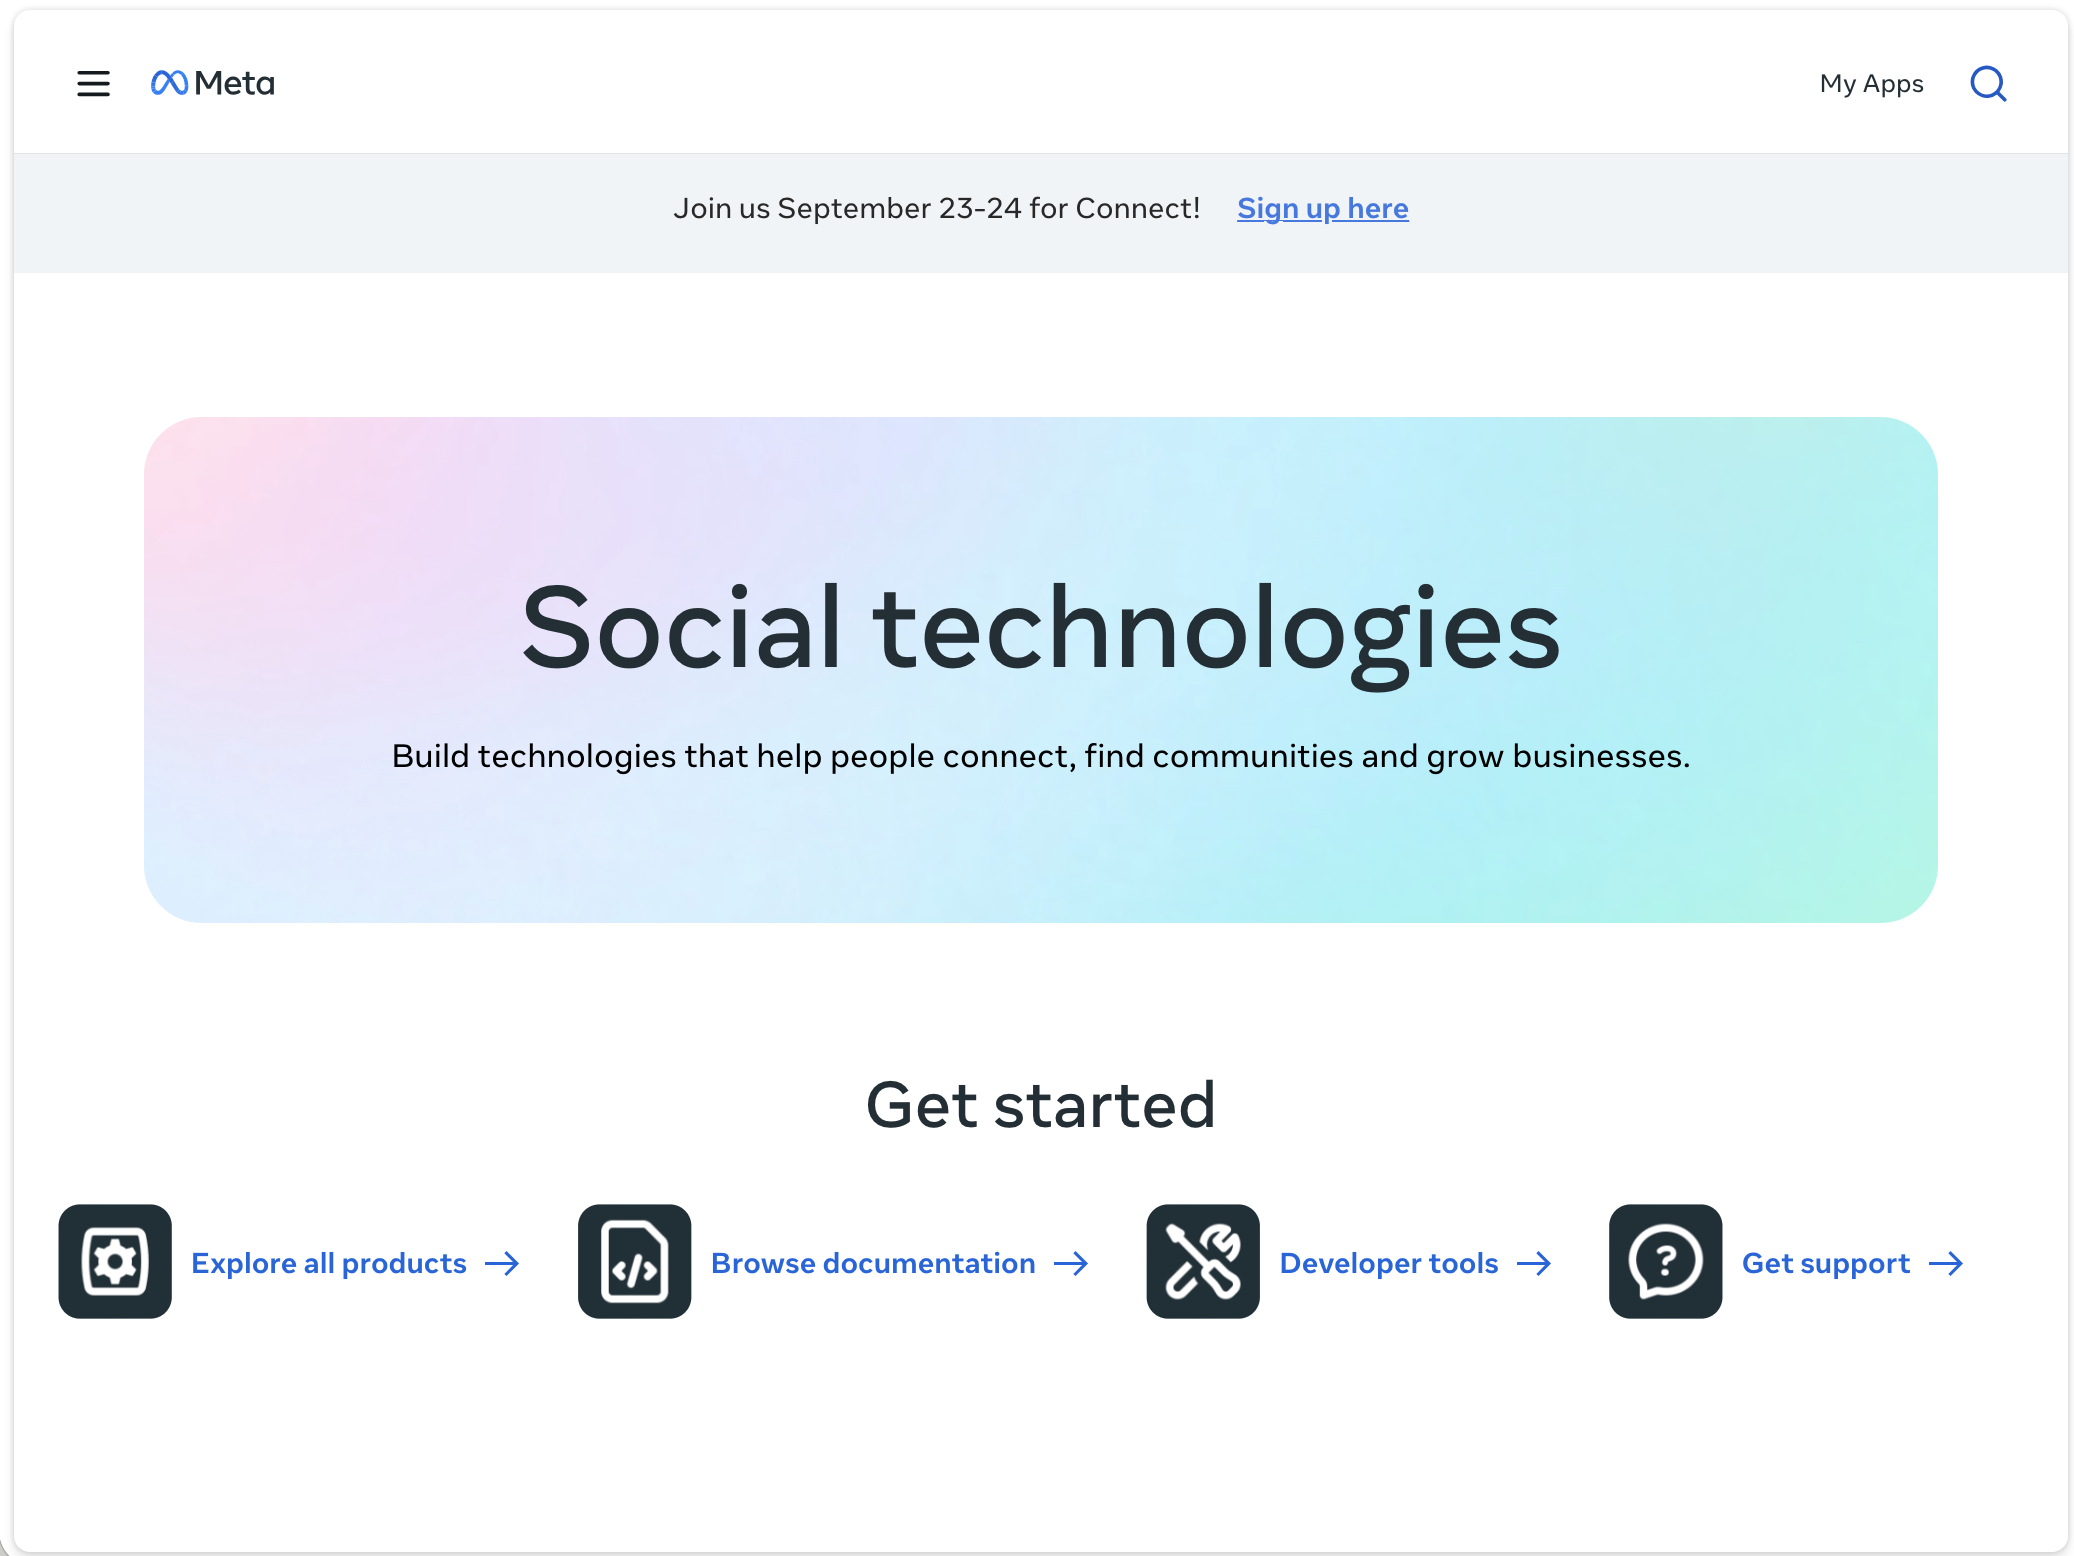
If it's your first time, Meta will ask you to register as a developer: accept the terms and verify your account (email or phone). It's free and takes 2 minutes.
1.2 Create the App
- Top right: My Apps → Create App button.
- When it asks for the type or use case, choose thebusiness / Business option (or the "Engage with customers on Messenger" use case if the wizard offers it directly).
- Give it a recognizable name (e.g. "MyBusiness Engine"), your contact email, and if you have a Business portfolio, select it.
- Create App → Meta may ask for your password to confirm.
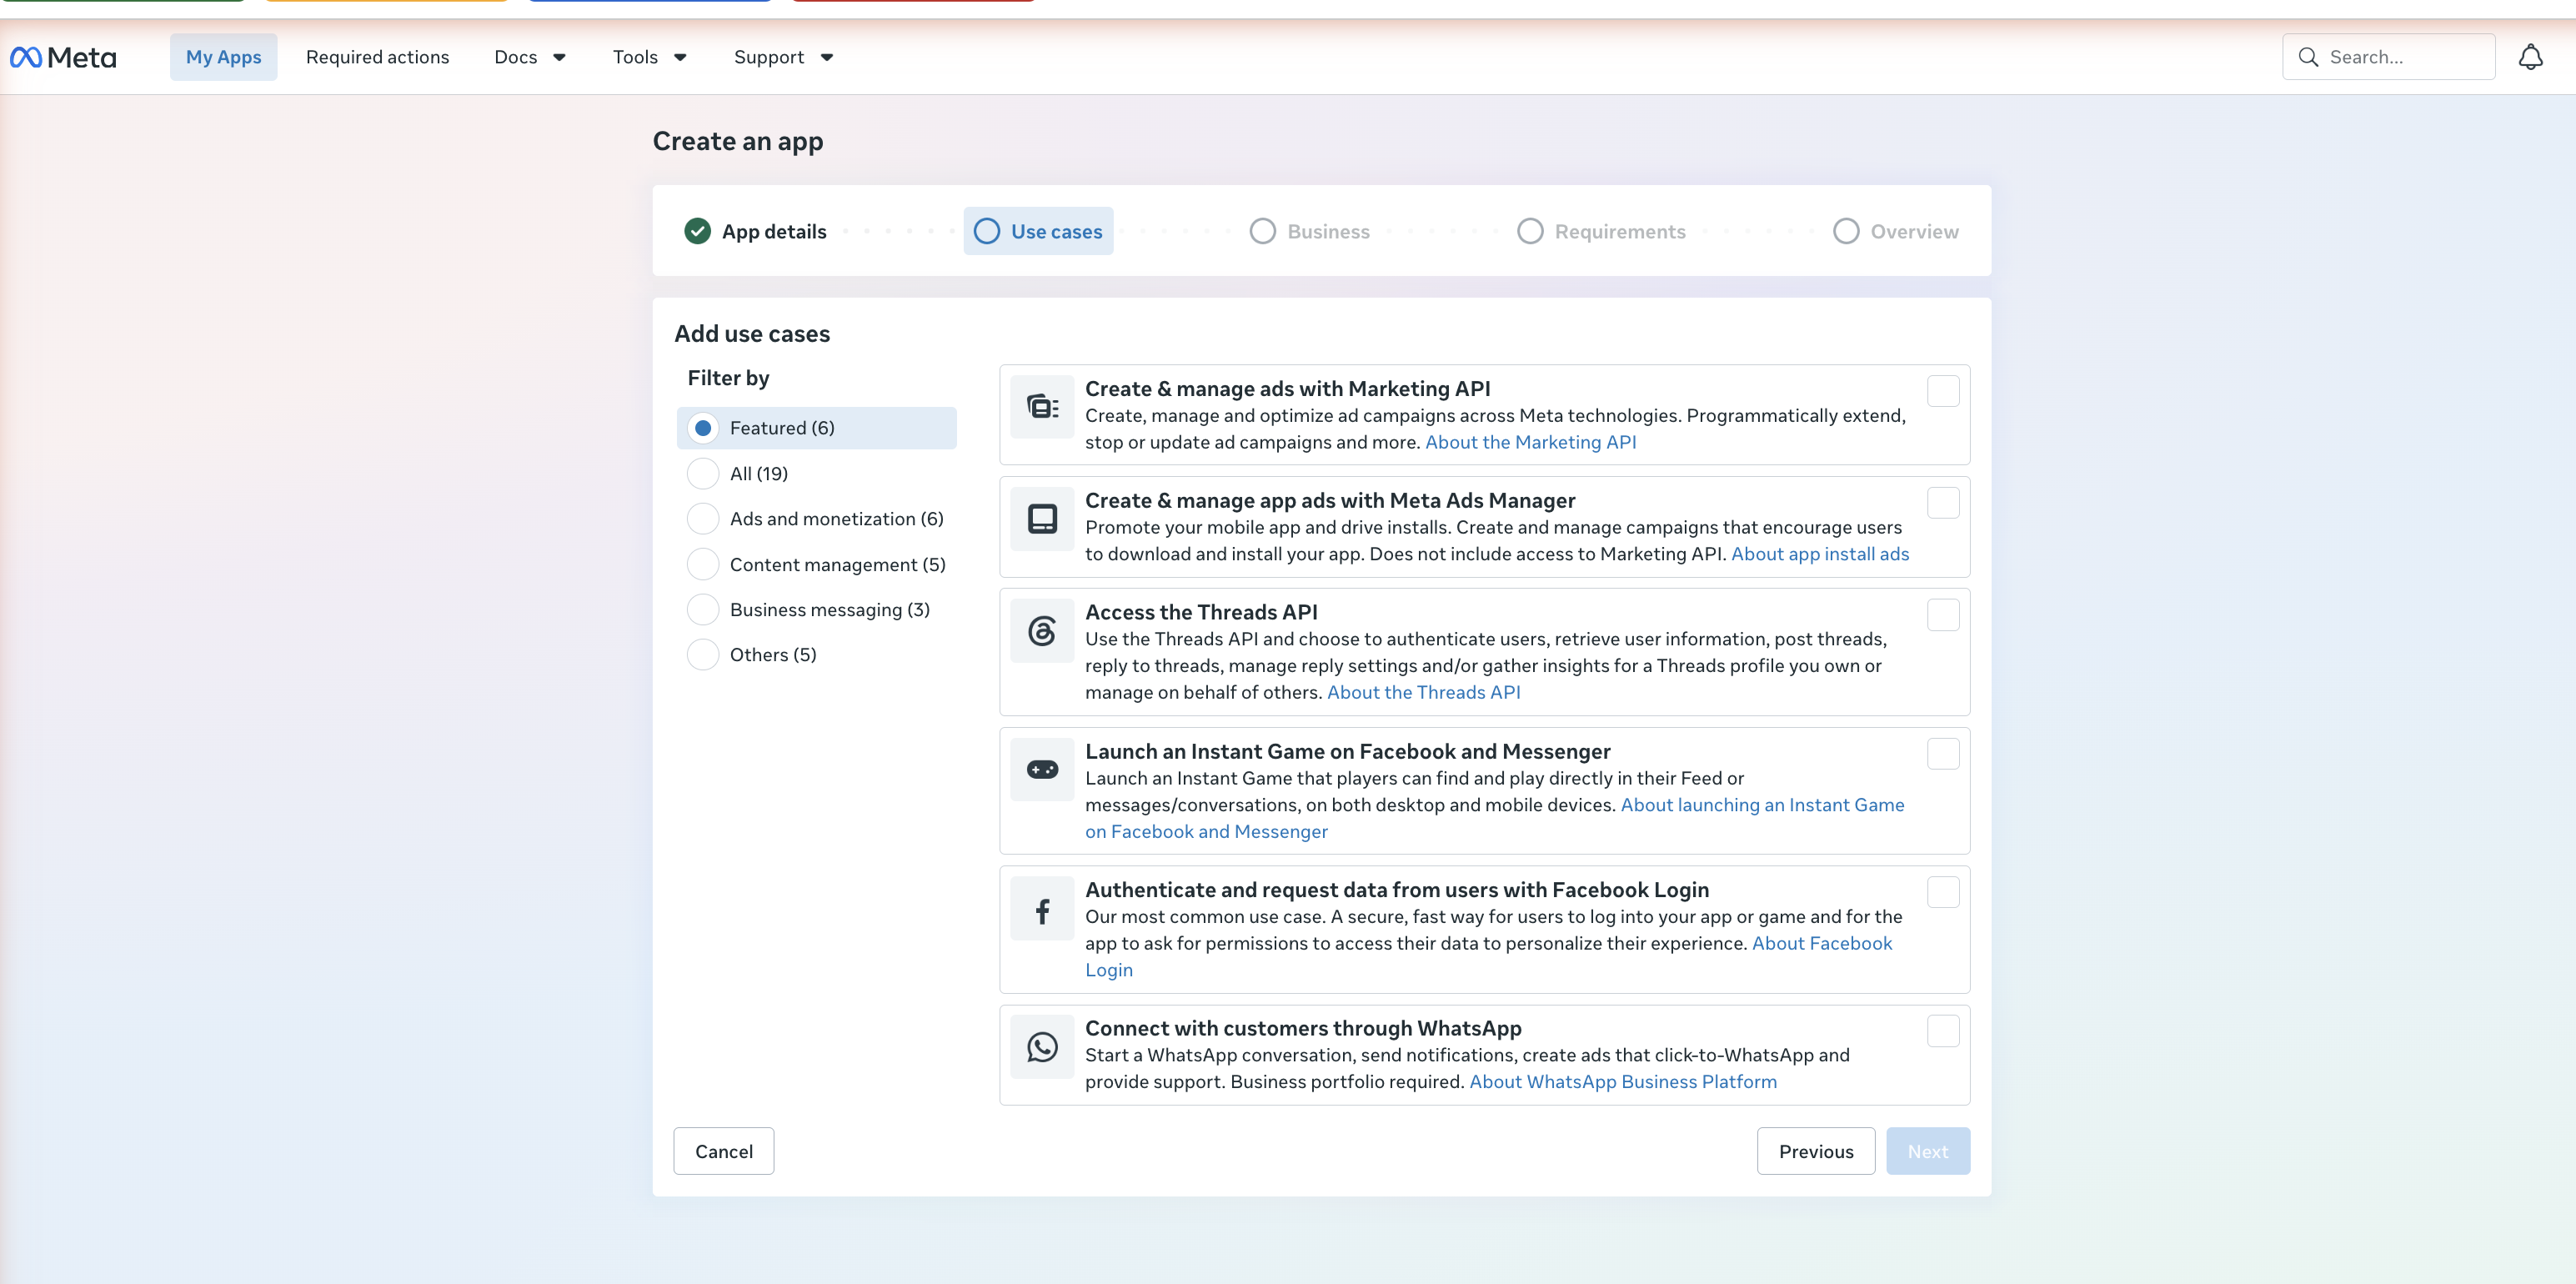
The app is born in "In development" mode
You'll see "Unpublished". It's normal and enough to connect: in this mode everything works for you and the accounts you add to the app. "Live" mode is only needed to serve the general public (see Part 5).
1.3 Add Messenger
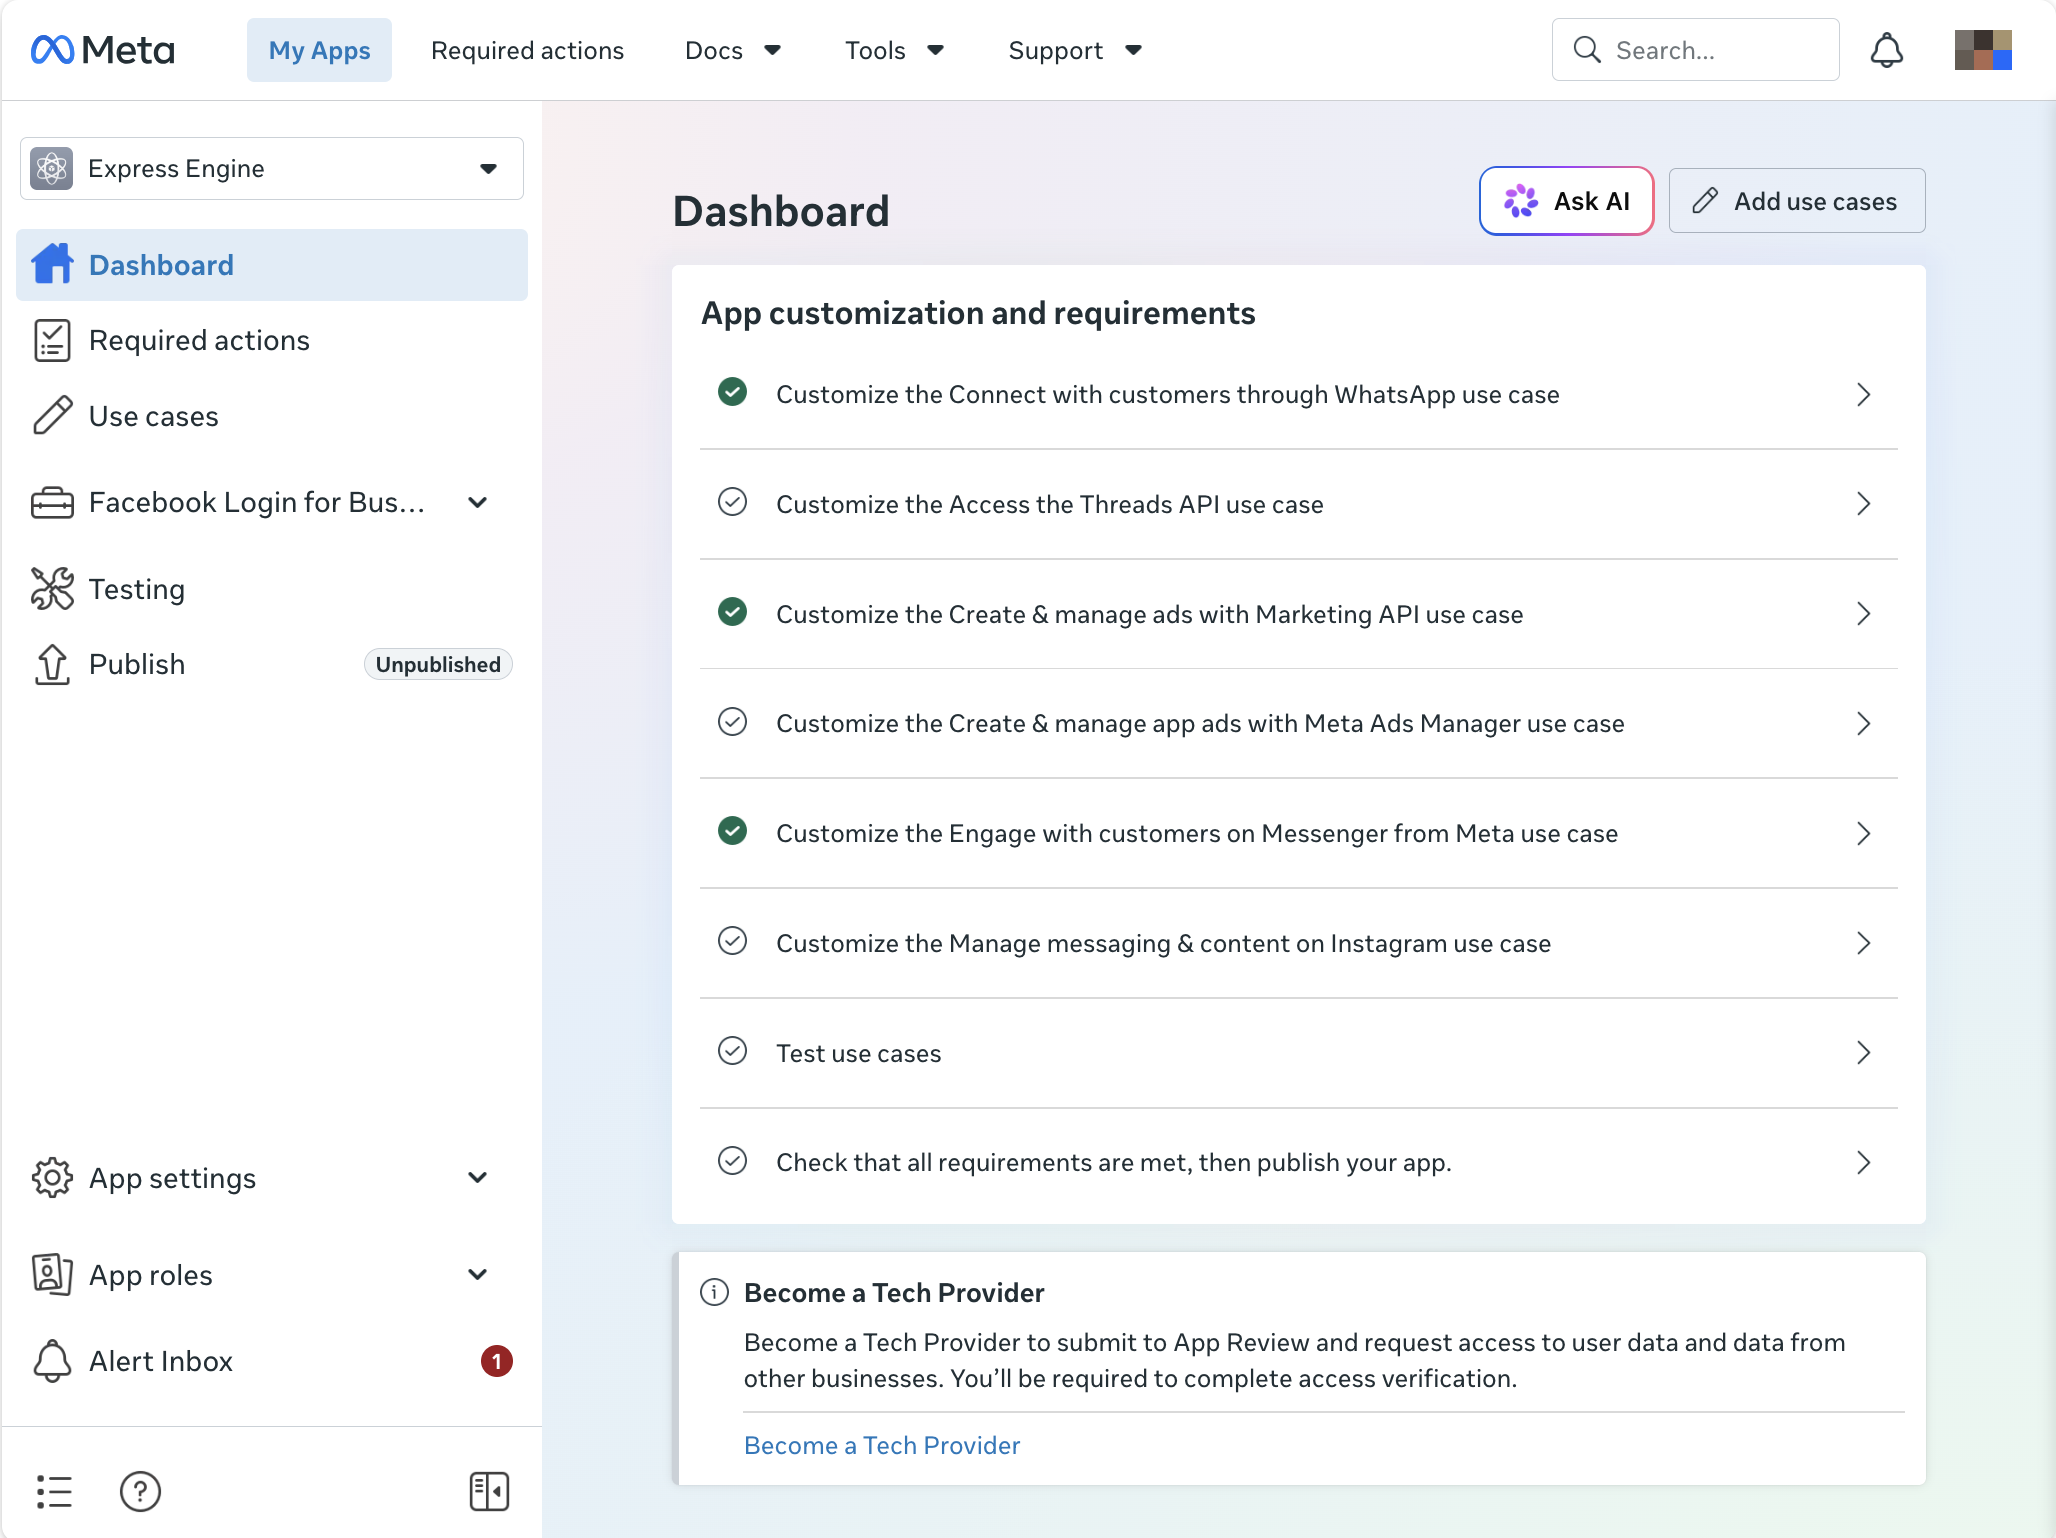
In your app panel, find the"Engage with customers on Messenger" use case (or theMessenger product in the side menu) and clickSet up. This enables the "Messenger API Settings" section.
Part 2 · Link your Page (here's trap #1)
2.1 Connect the Page
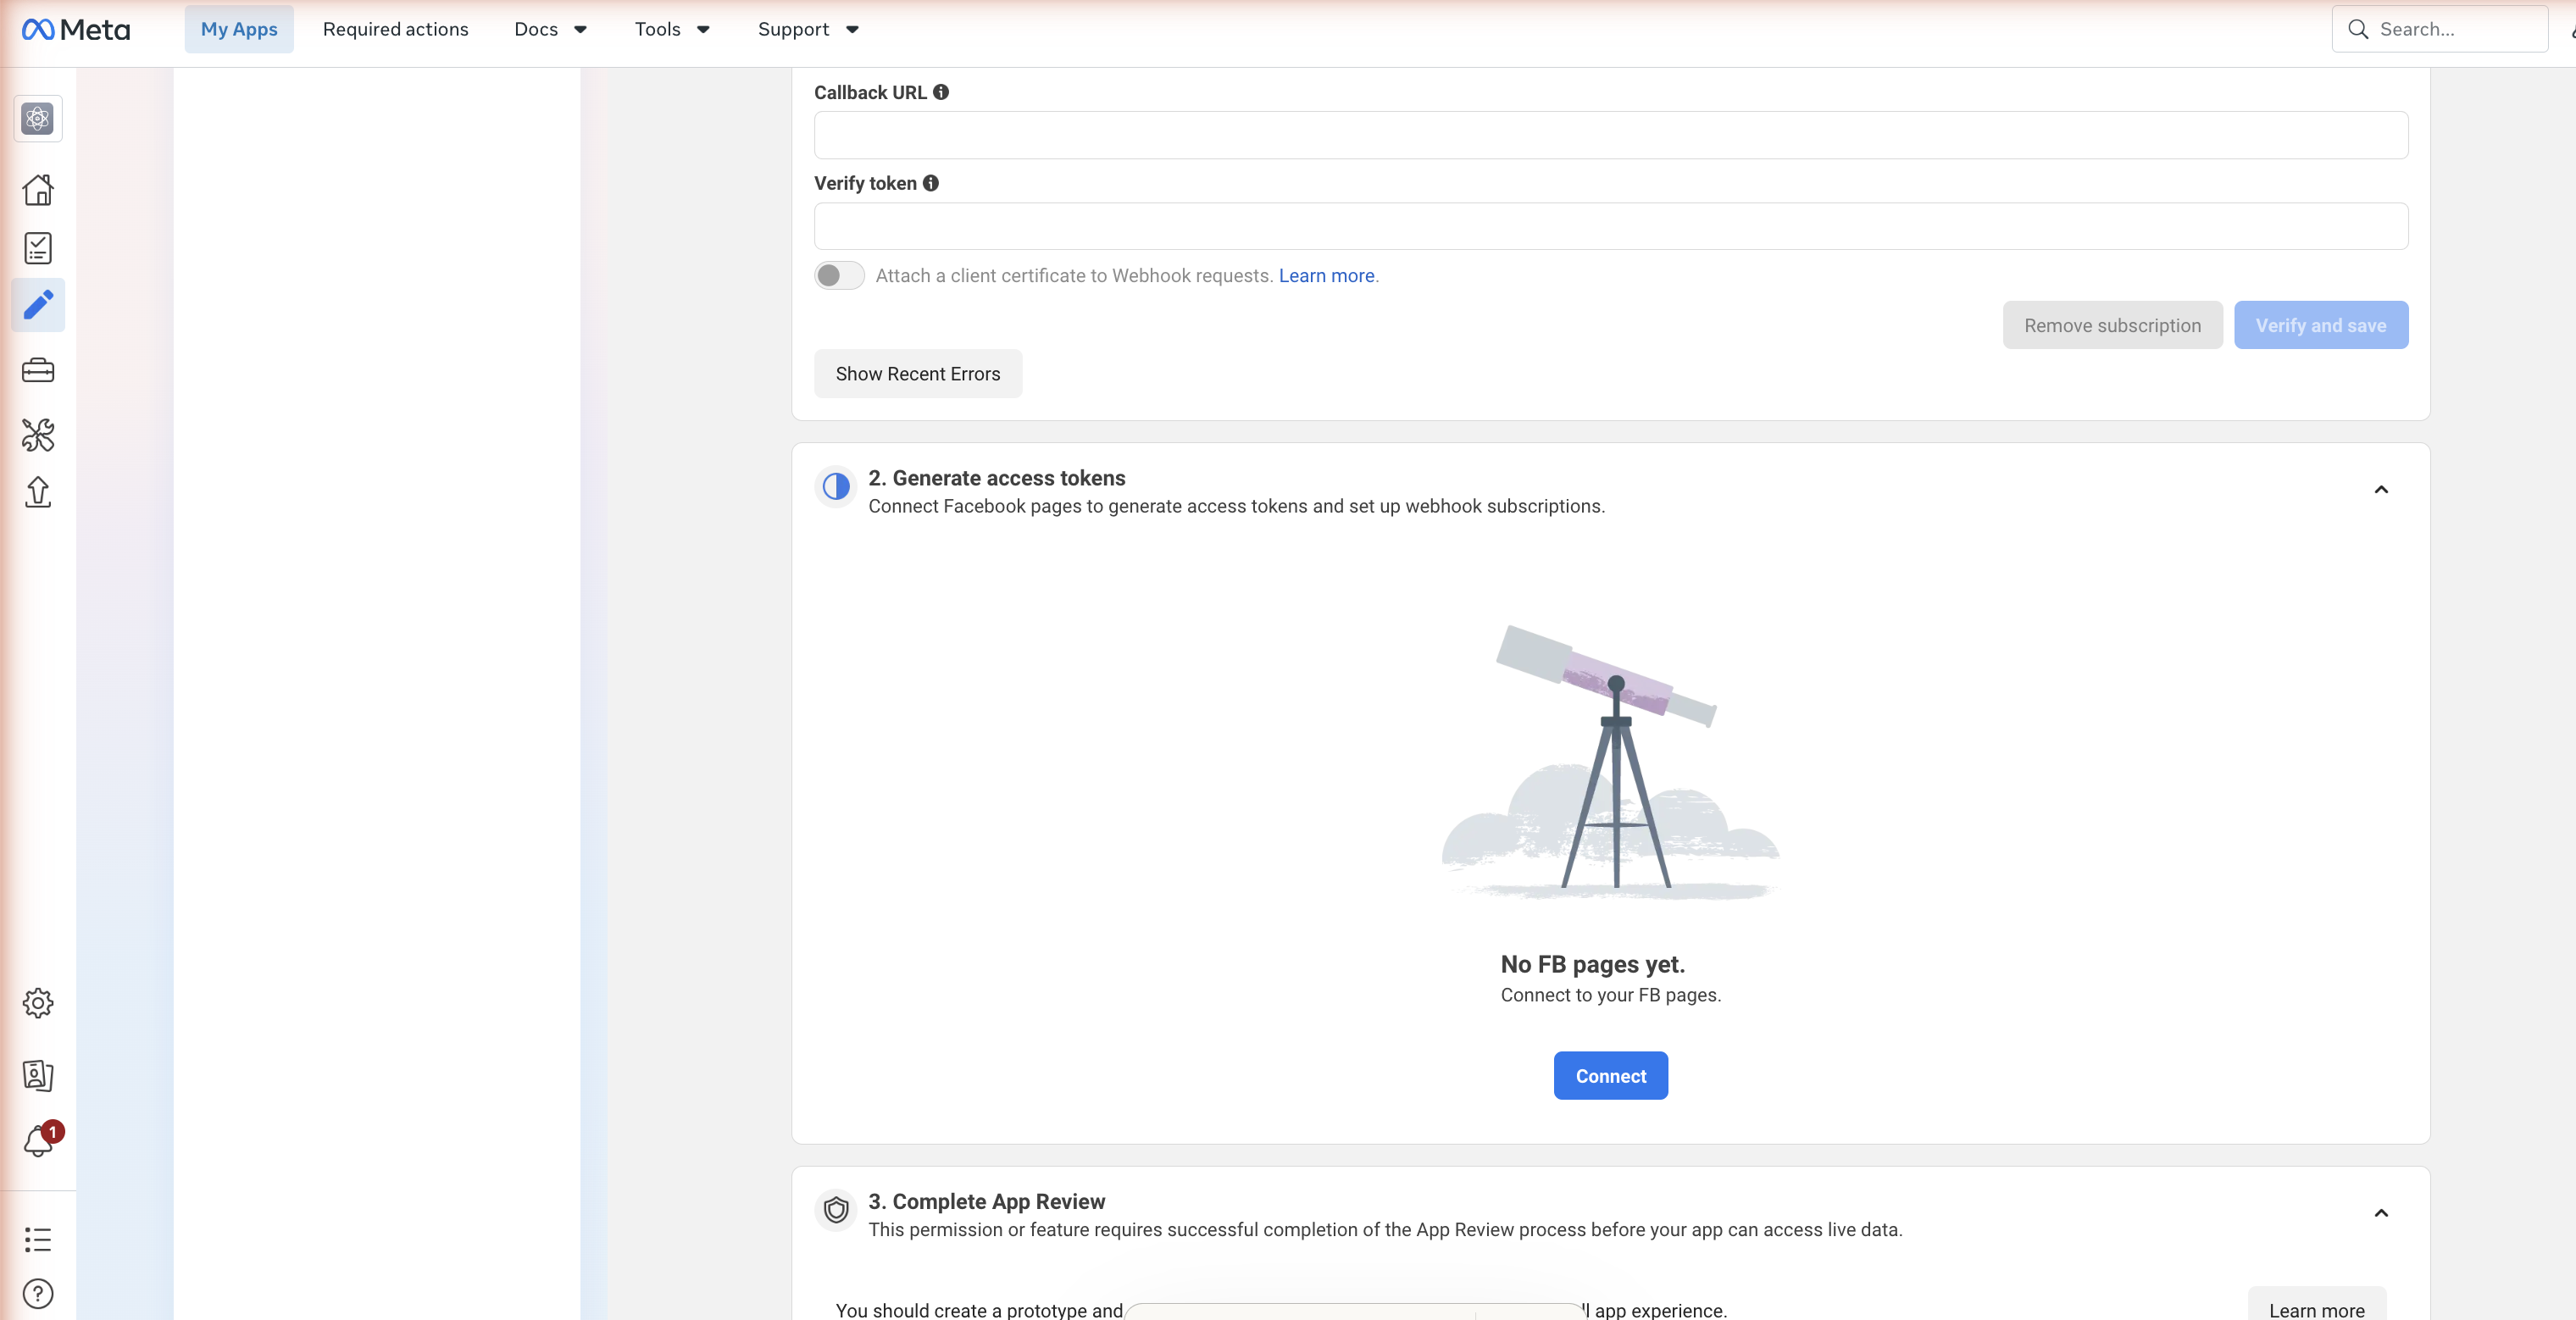
In Messenger API Settings, the"2. Generate access tokens" section, you'll see "No FB pages yet" with aConnect button. Click it.
2.2 Authorize in the popup
In the Facebook window:
- Select your Page (only the business one you're connecting).
- On the permissions screen, leave them ALL enabled — especially the Page messages one. If you uncheck any, your token comes out incomplete and the bot won't be able to read or reply.
- Confirm (Done).
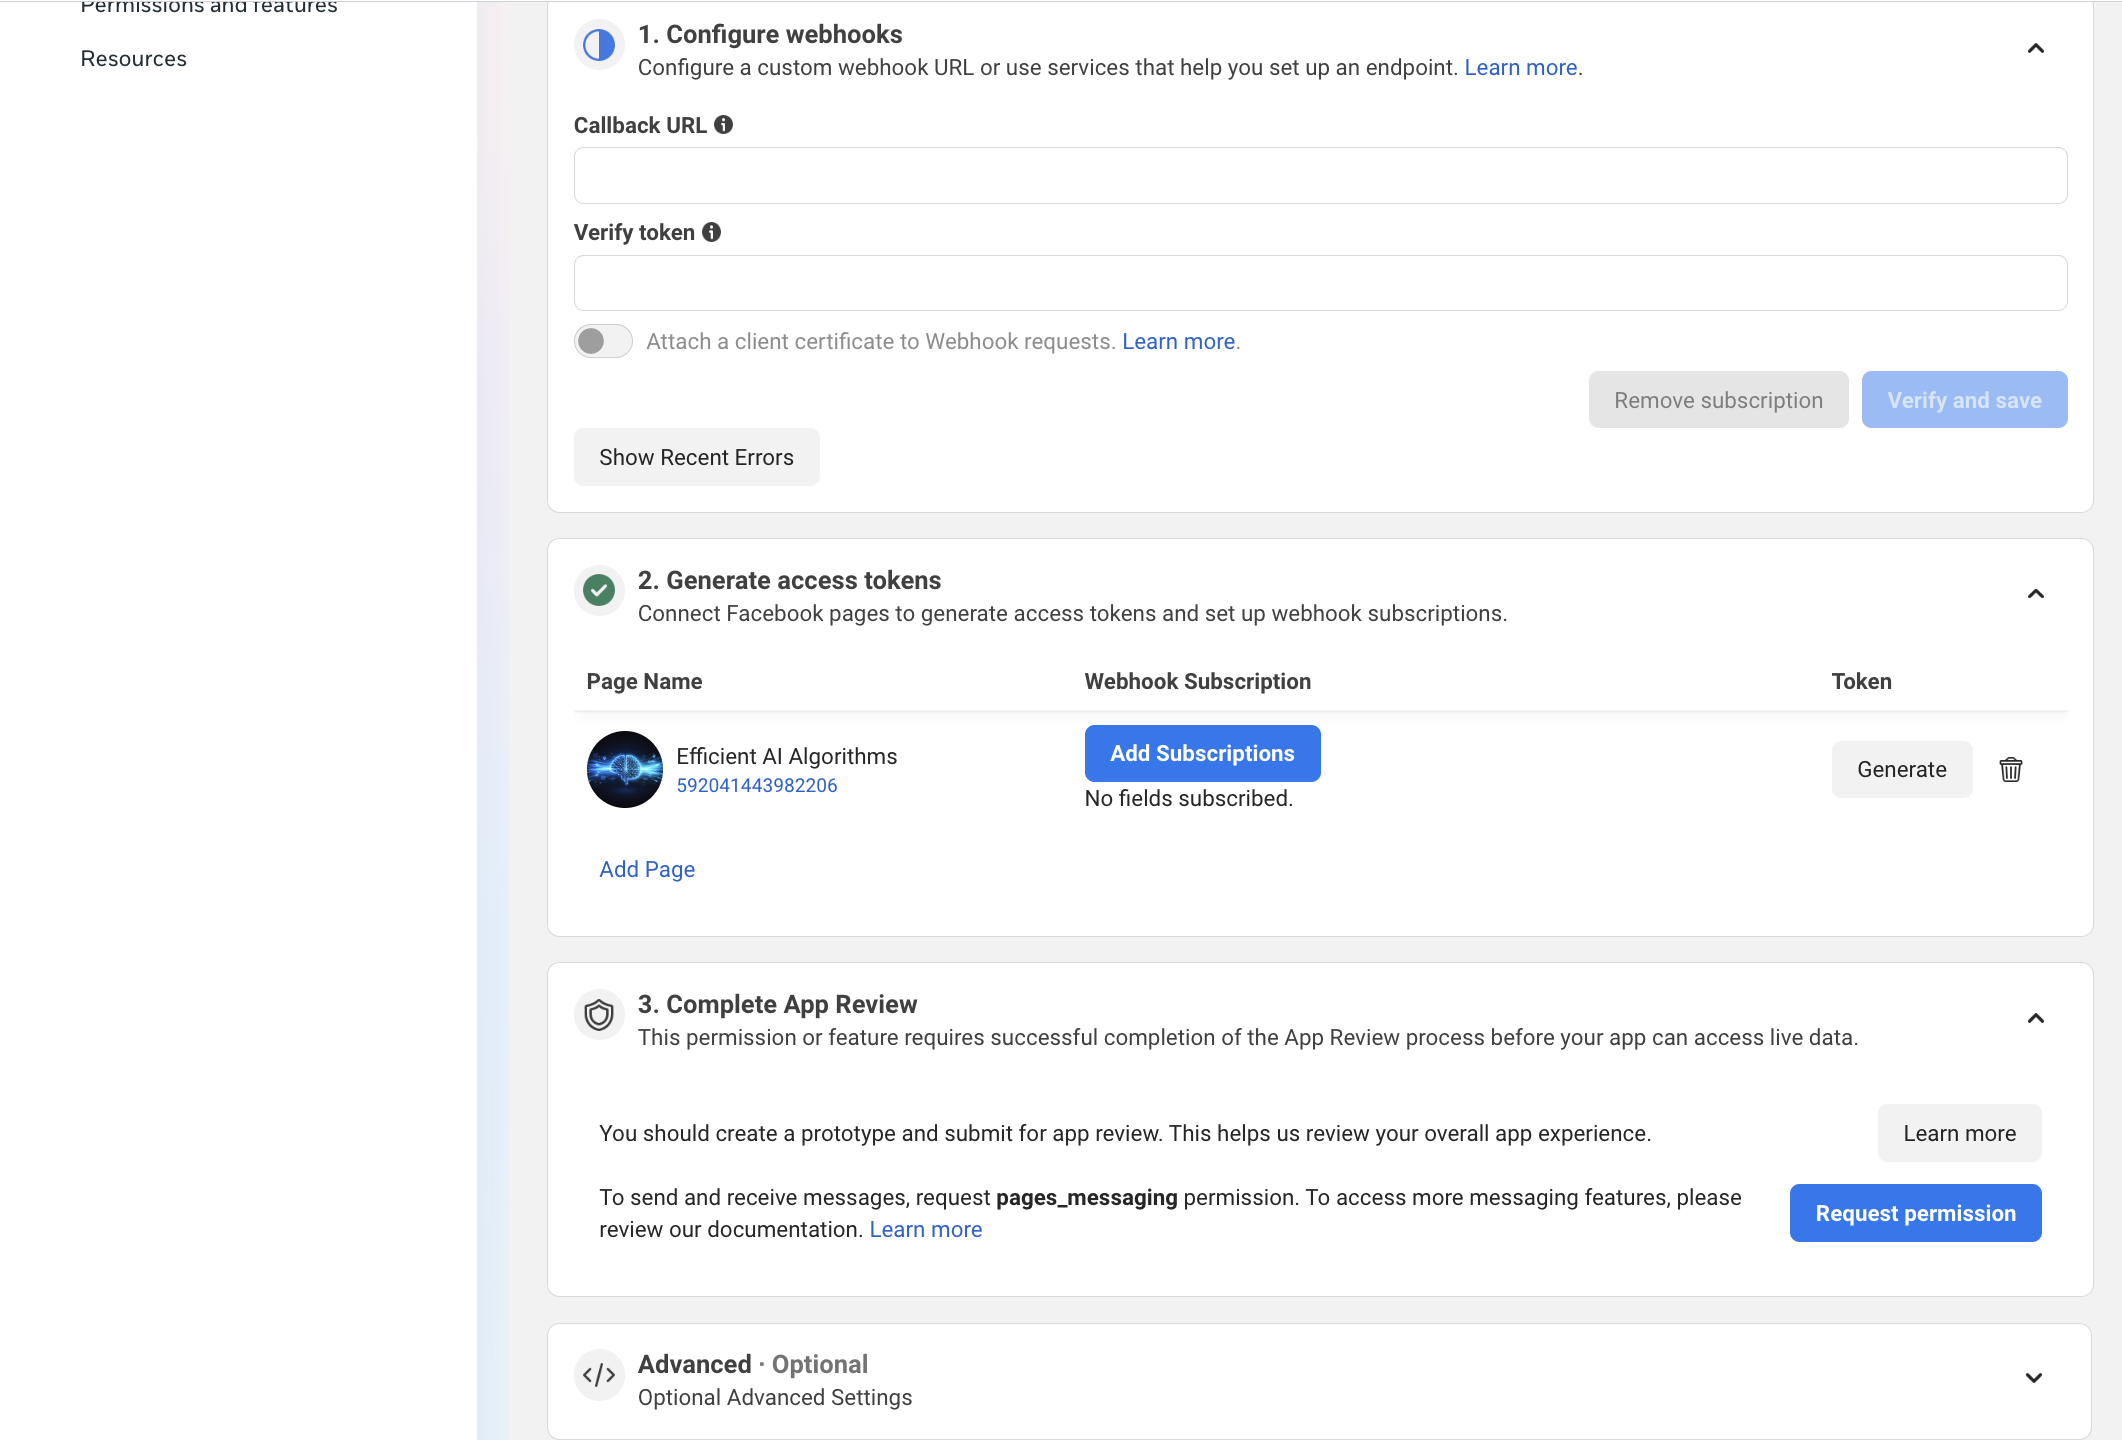
When it works, the section will show your Page listed with agreen check ✓.
Part 3 · Get your 3 credentials
Golden rule before continuing
These values are secret (the first two). Store them in a password manager or a secure local file. Never paste them in chats, emails, screenshots or posts. Anyone with your token can read and send messages as your Page.
3.1 Page Access Token
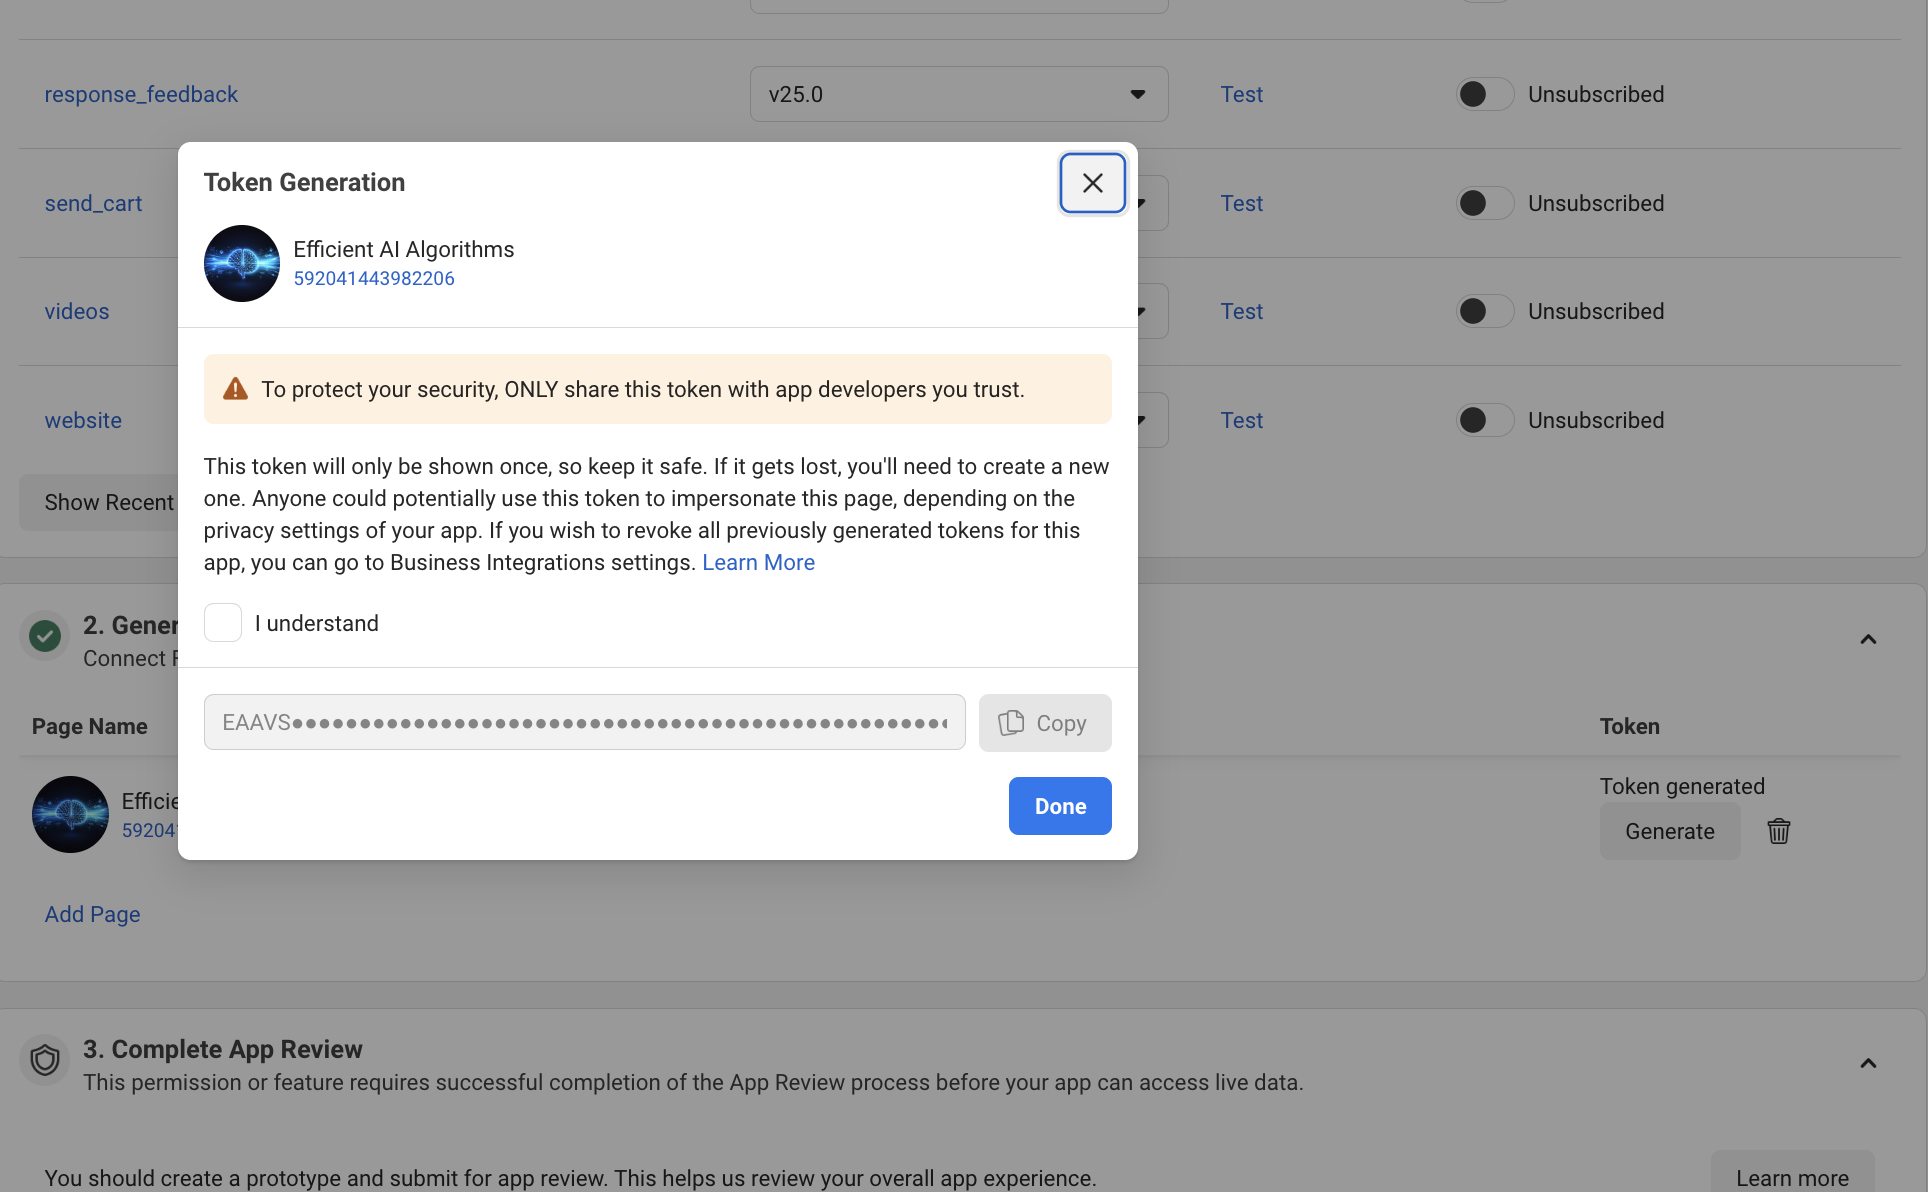
In Messenger API Settings → "2. Generate access tokens", in your Page's row, click Generate. The"Token Generation" modal opens:
- Read the notice ("this token is shown ONCE only") and check the"I understand" box — without checking it you can't copy.
- The token appears partially masked (
EAAVS•••…). Use theCopy button in the modal — never a manual selection (it avoids truncation). - Click Done. The row will now show the"Token generated" label next to the Generate button — that label is your confirmation that it exists. (The Generate button stays: it's for regenerating if you lose it.)
3.2 App Secret
- Your app's side menu → App settings → Basic.
- Next to "App secret" (shown as dots ••••), click Show.
- Meta will ask for your Facebook password (that's normal, it's a security confirmation).
- Copy the value and store it in your secure place.
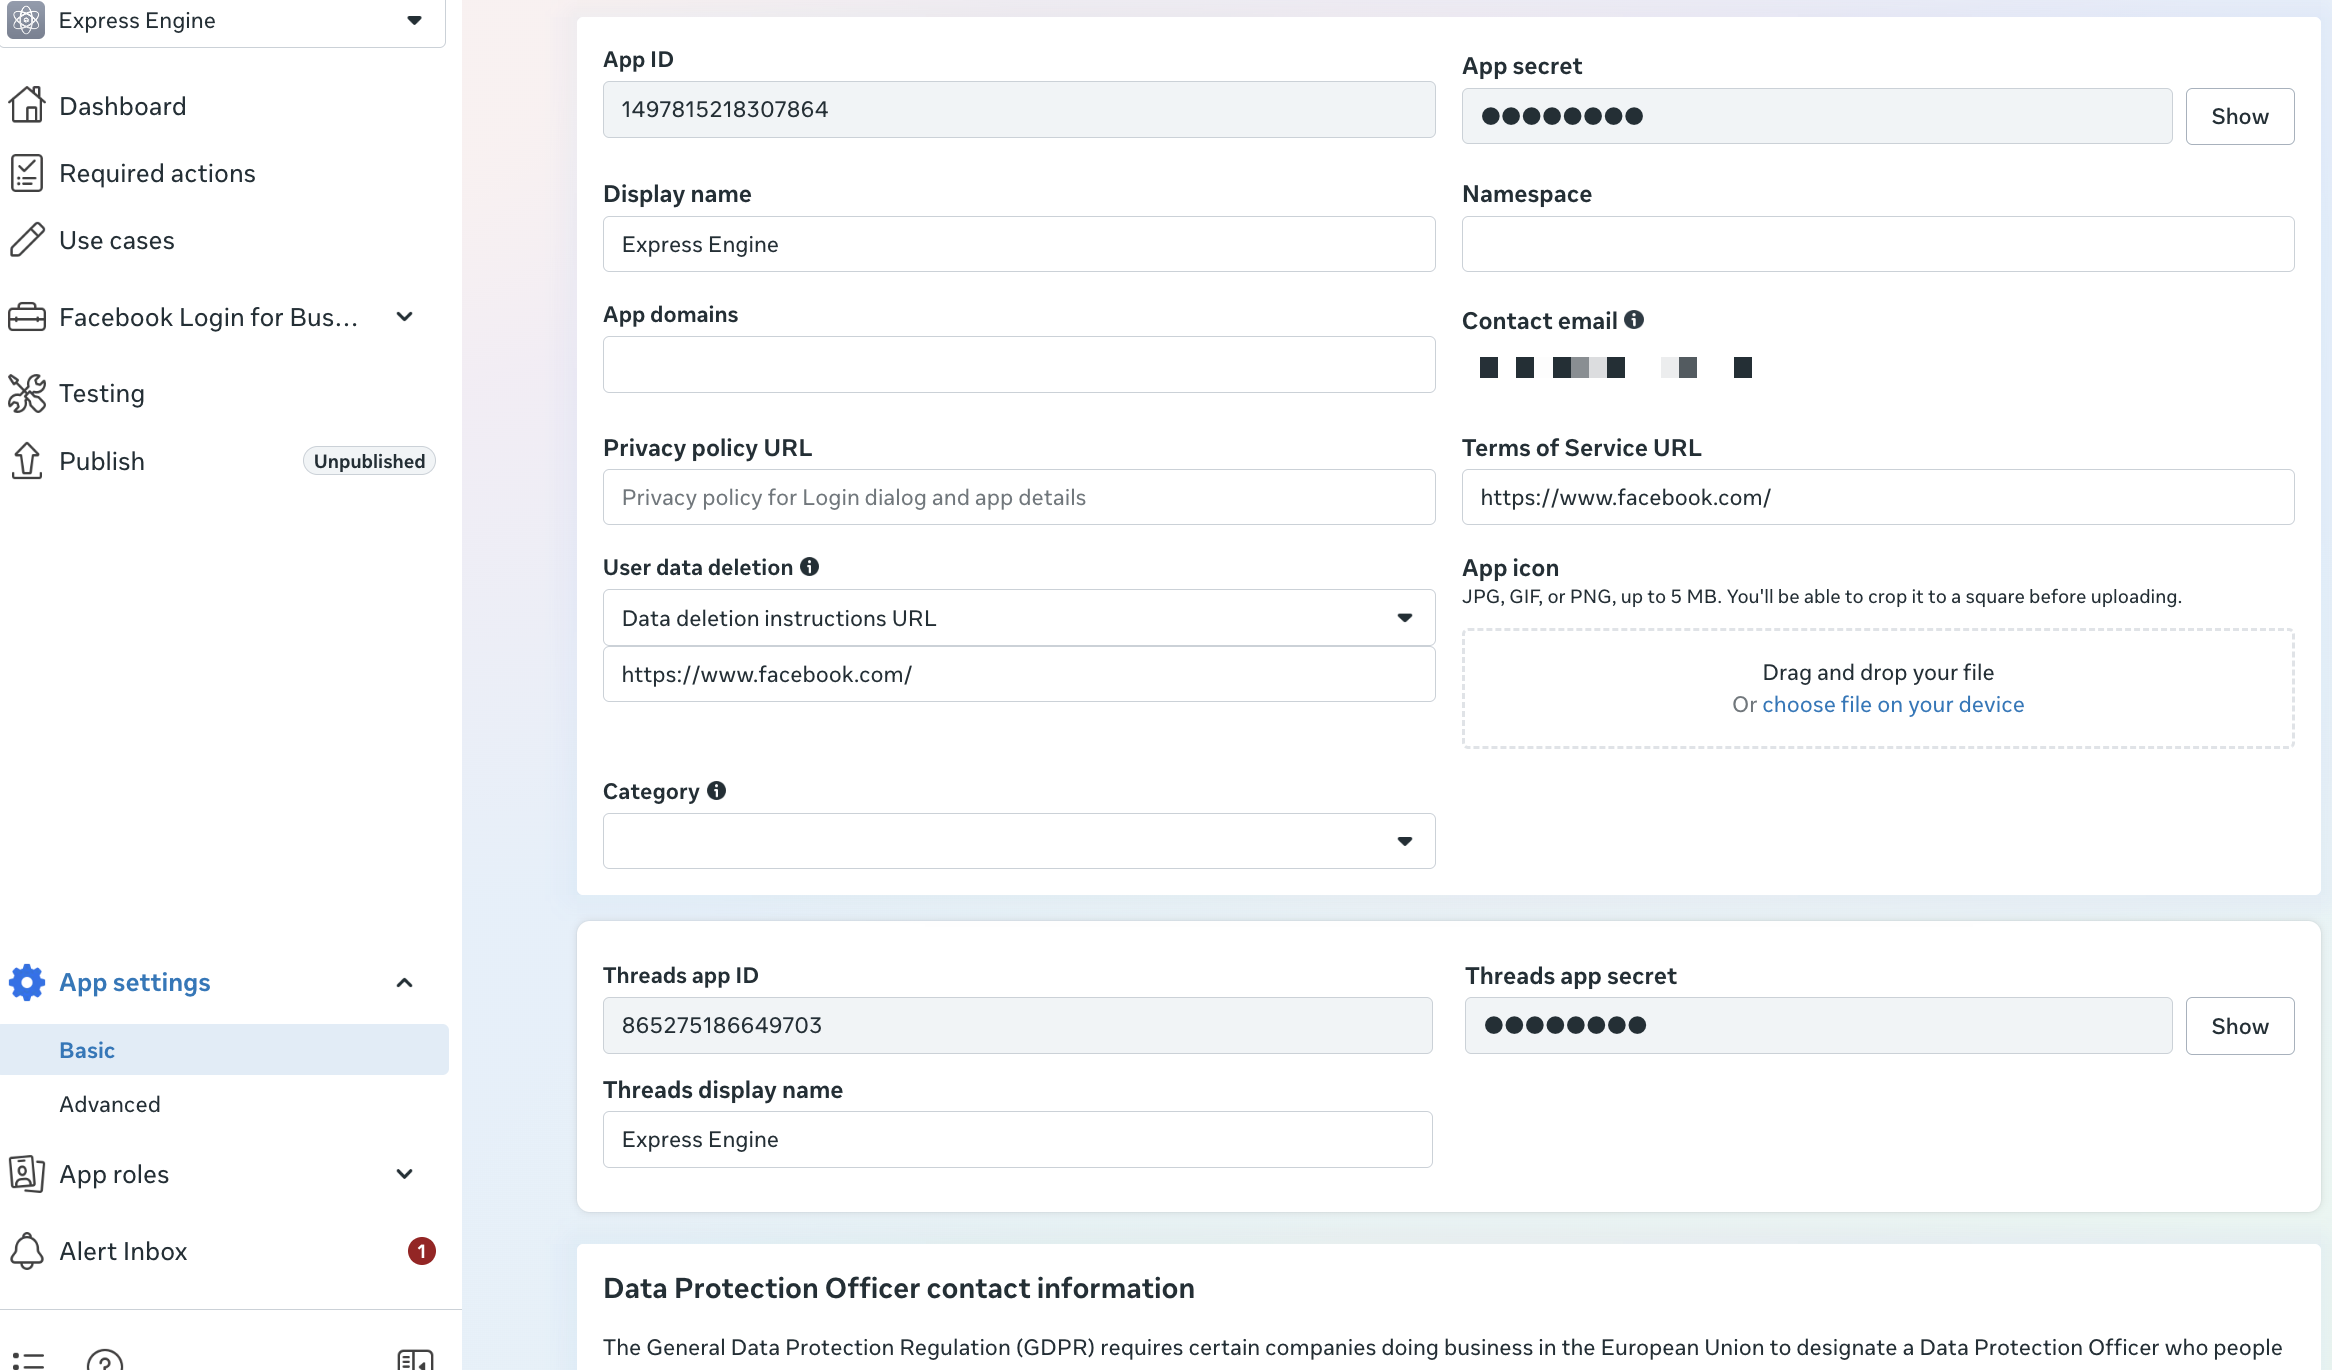
The App Secret is in App settings → Basic, NOT on the Messenger screen. It's the most common mix-up: looking for it where you generated the token.
3.3 Page ID
Your Page ID is not secret. You see it in the same row where you generated the token (next to the Page name), or on your Facebook Page → Settings → at the bottom, "Page ID".
Now you have the 3 values
App Secret · Page Access Token · Page ID. Hand them to your platform through the secure channel it specifies (usually an encrypted form or a command in your own terminal — never by chat or email).
Part 4 · The webhook (if your platform asks for it)
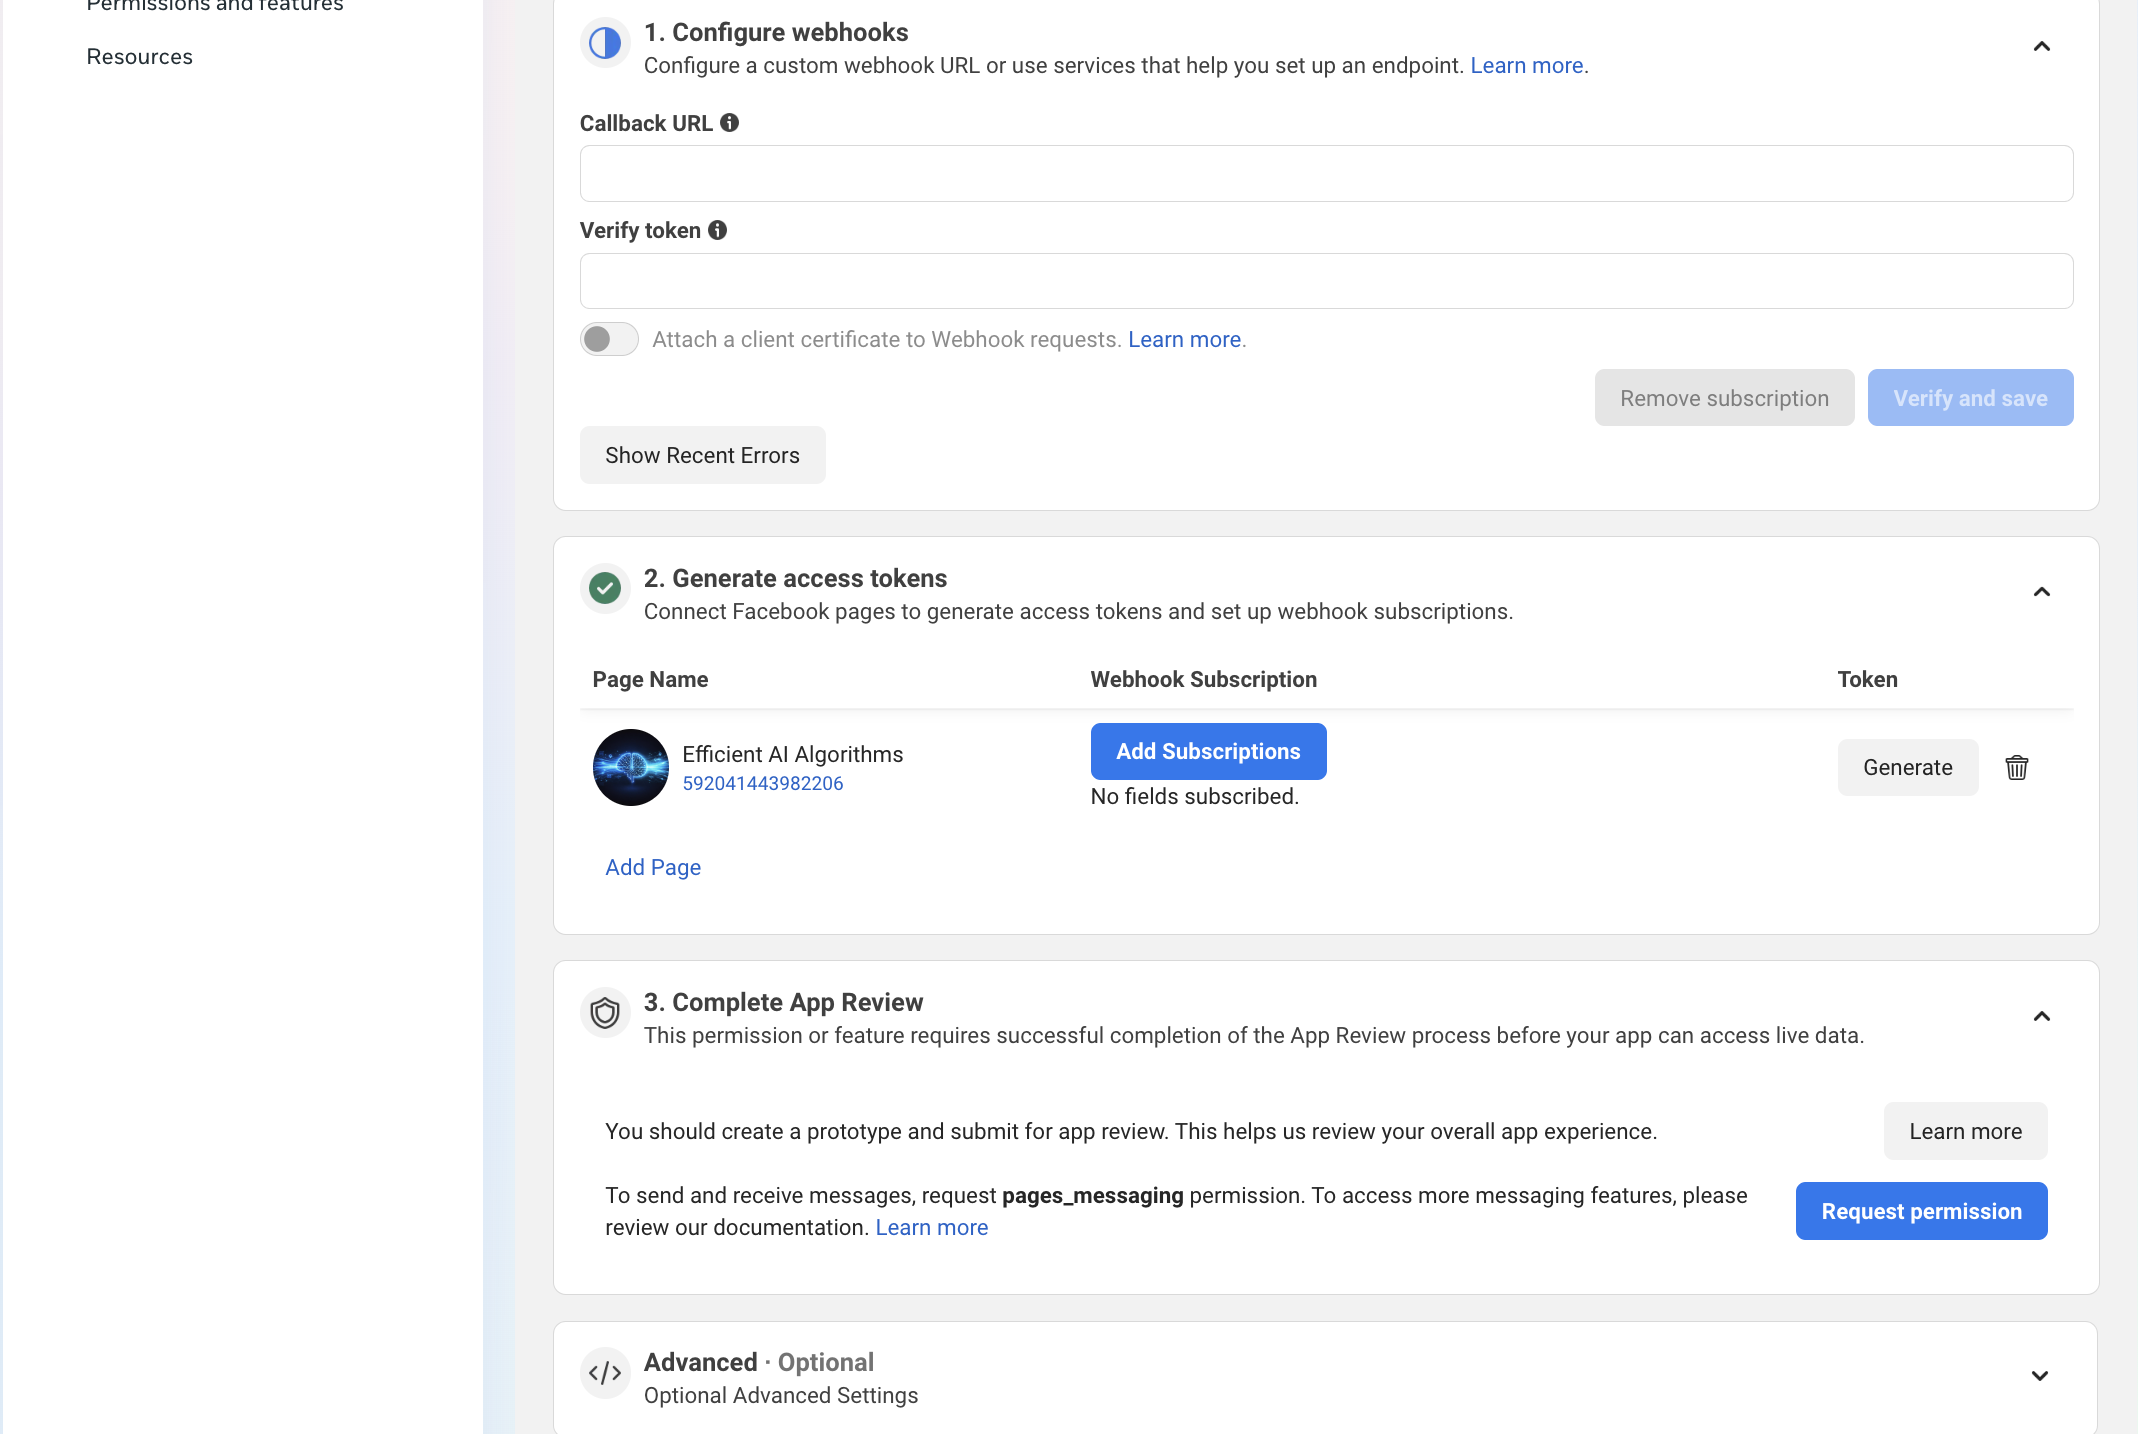
Some platforms, after receiving your credentials, give you back two values to "close the loop": a Callback URL and aVerify Token. You paste them like this:
- In your app: Messenger → Webhooks (or the "Webhook Subscription" section next to your page).
- Paste the Callback URL and the Verify Tokenexactly as the platform gave them to you → Verify and Save.
- Subscribe to the right fields: the Add Subscriptions button next to your page.
What the complete, healthy loop looks like
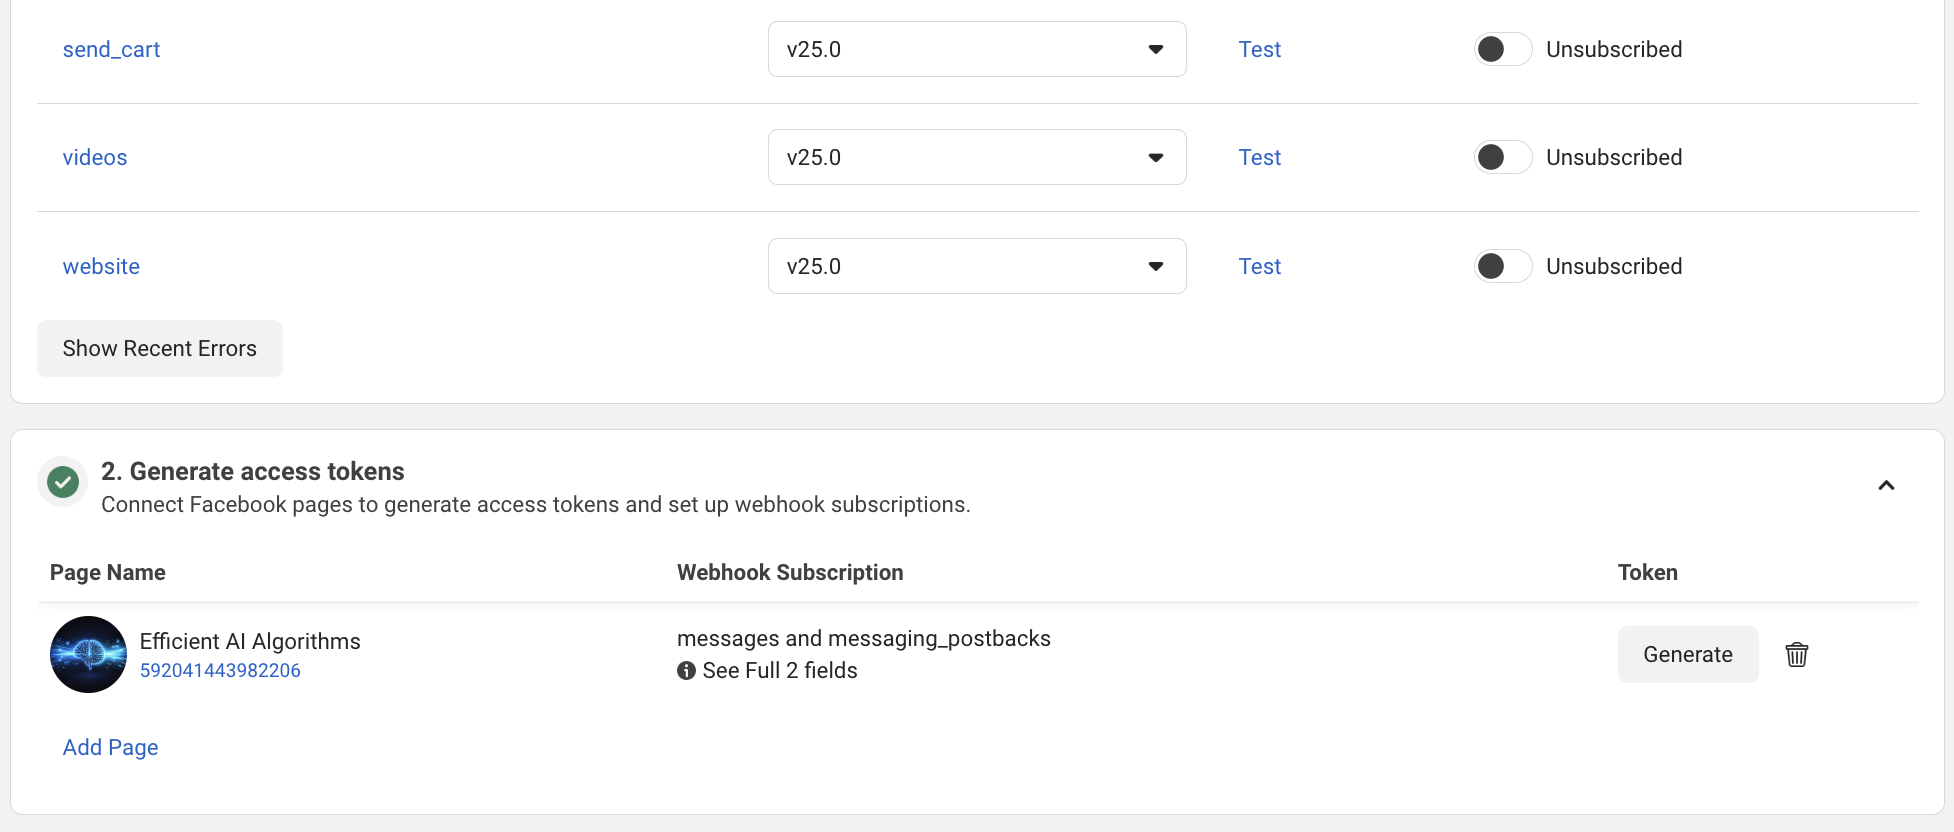
Your final checklist — the four indicators in green:
- The "1. Configure webhooks" section has a green check and the Callback URL saved (treat that URL as semi-secret: don't publish it).
- In the fields list,
messagesandmessaging_postbacksshow the toggle at "Subscribed". - Your page's row says "messages and messaging_postbacks" under Webhook Subscription and "Token generated" in the Token column.
- With those four indicators green, the Meta side is done.
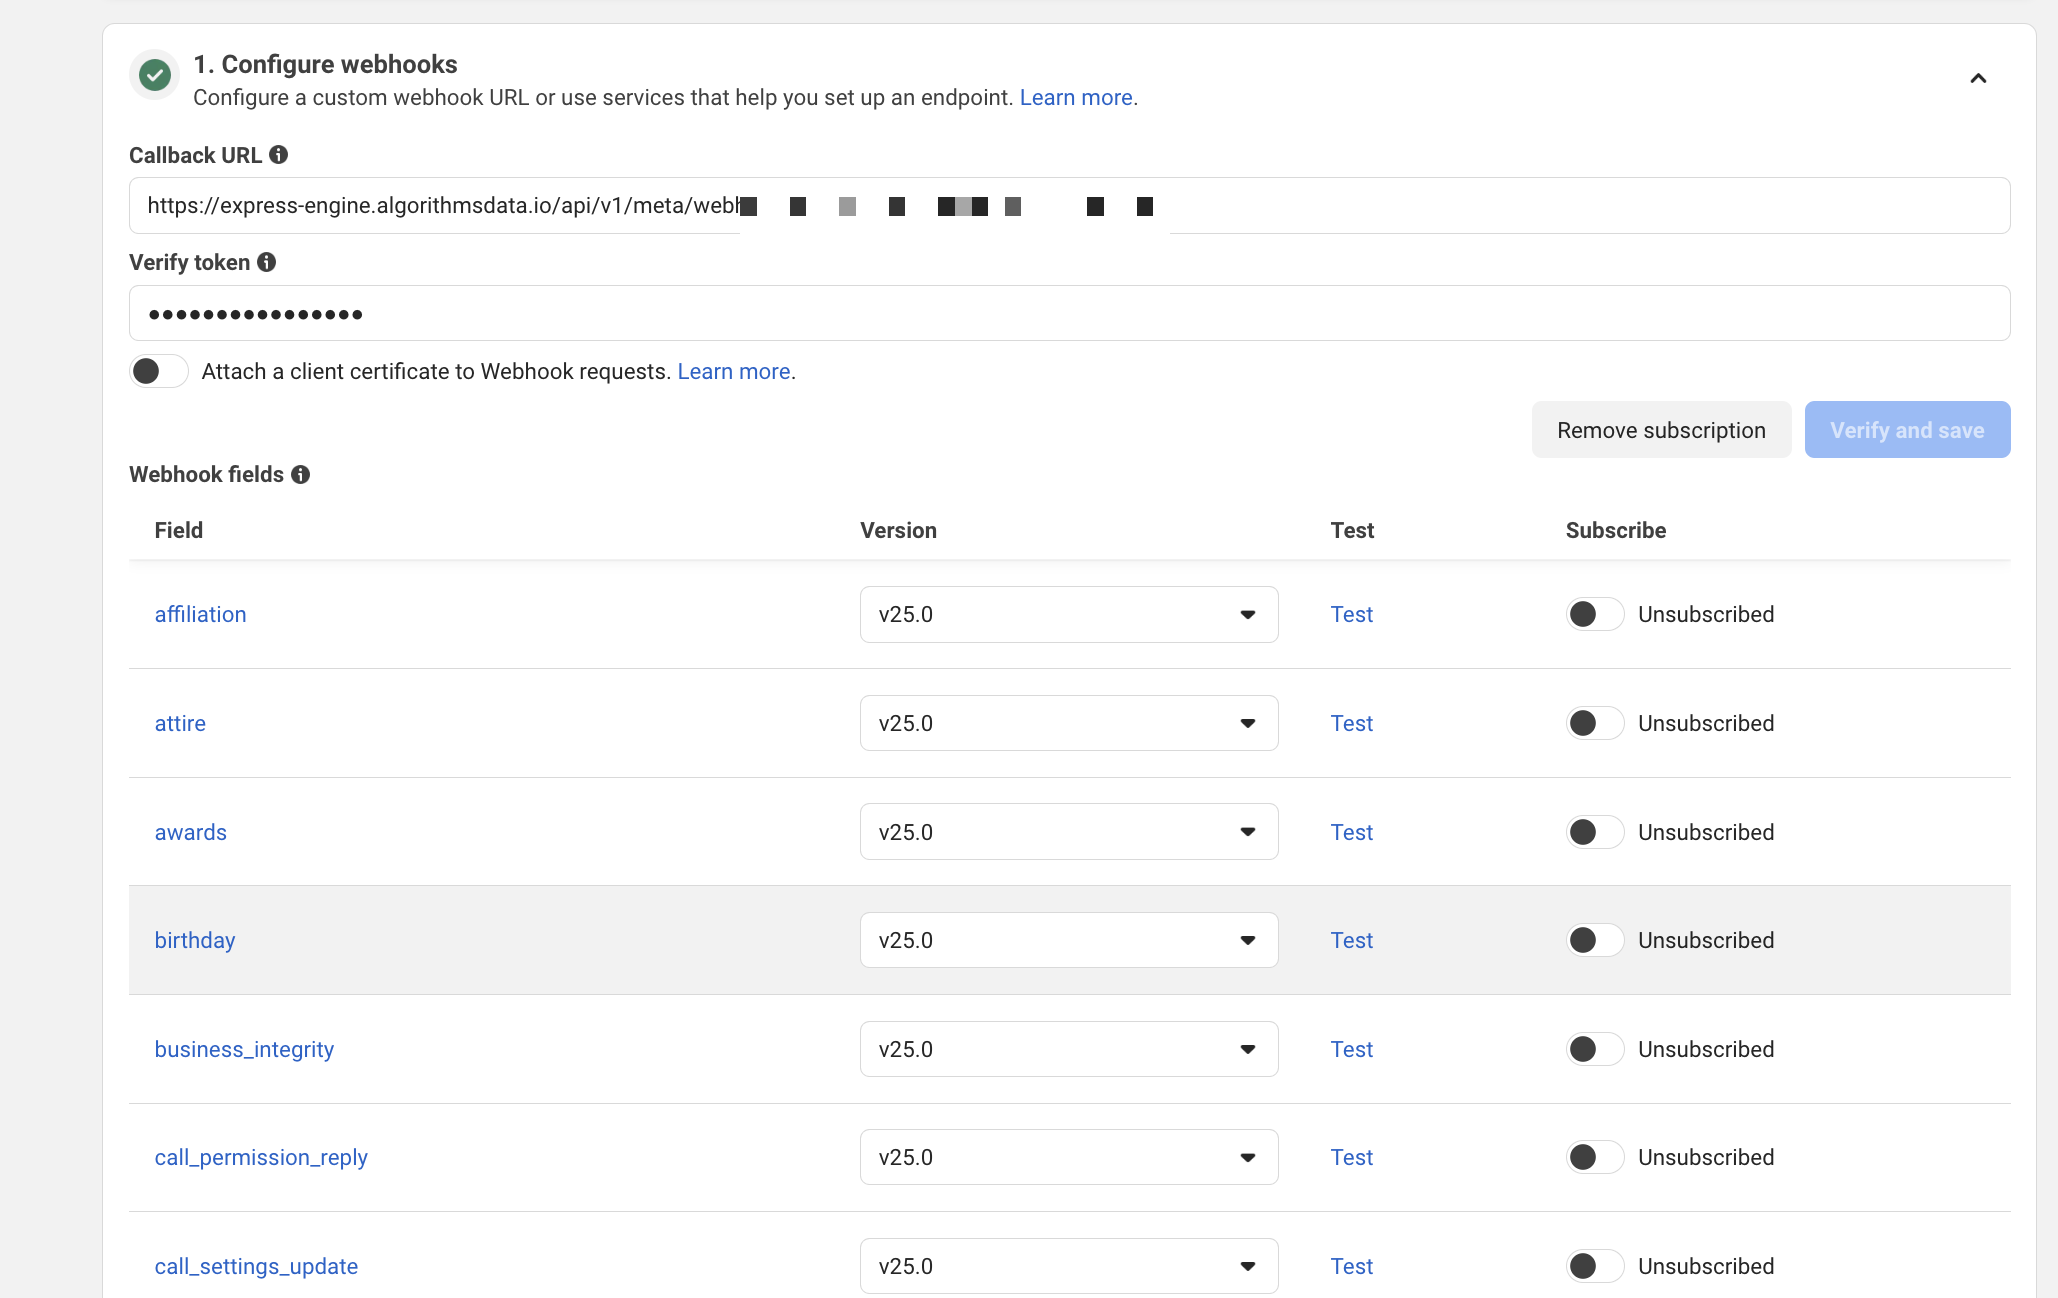
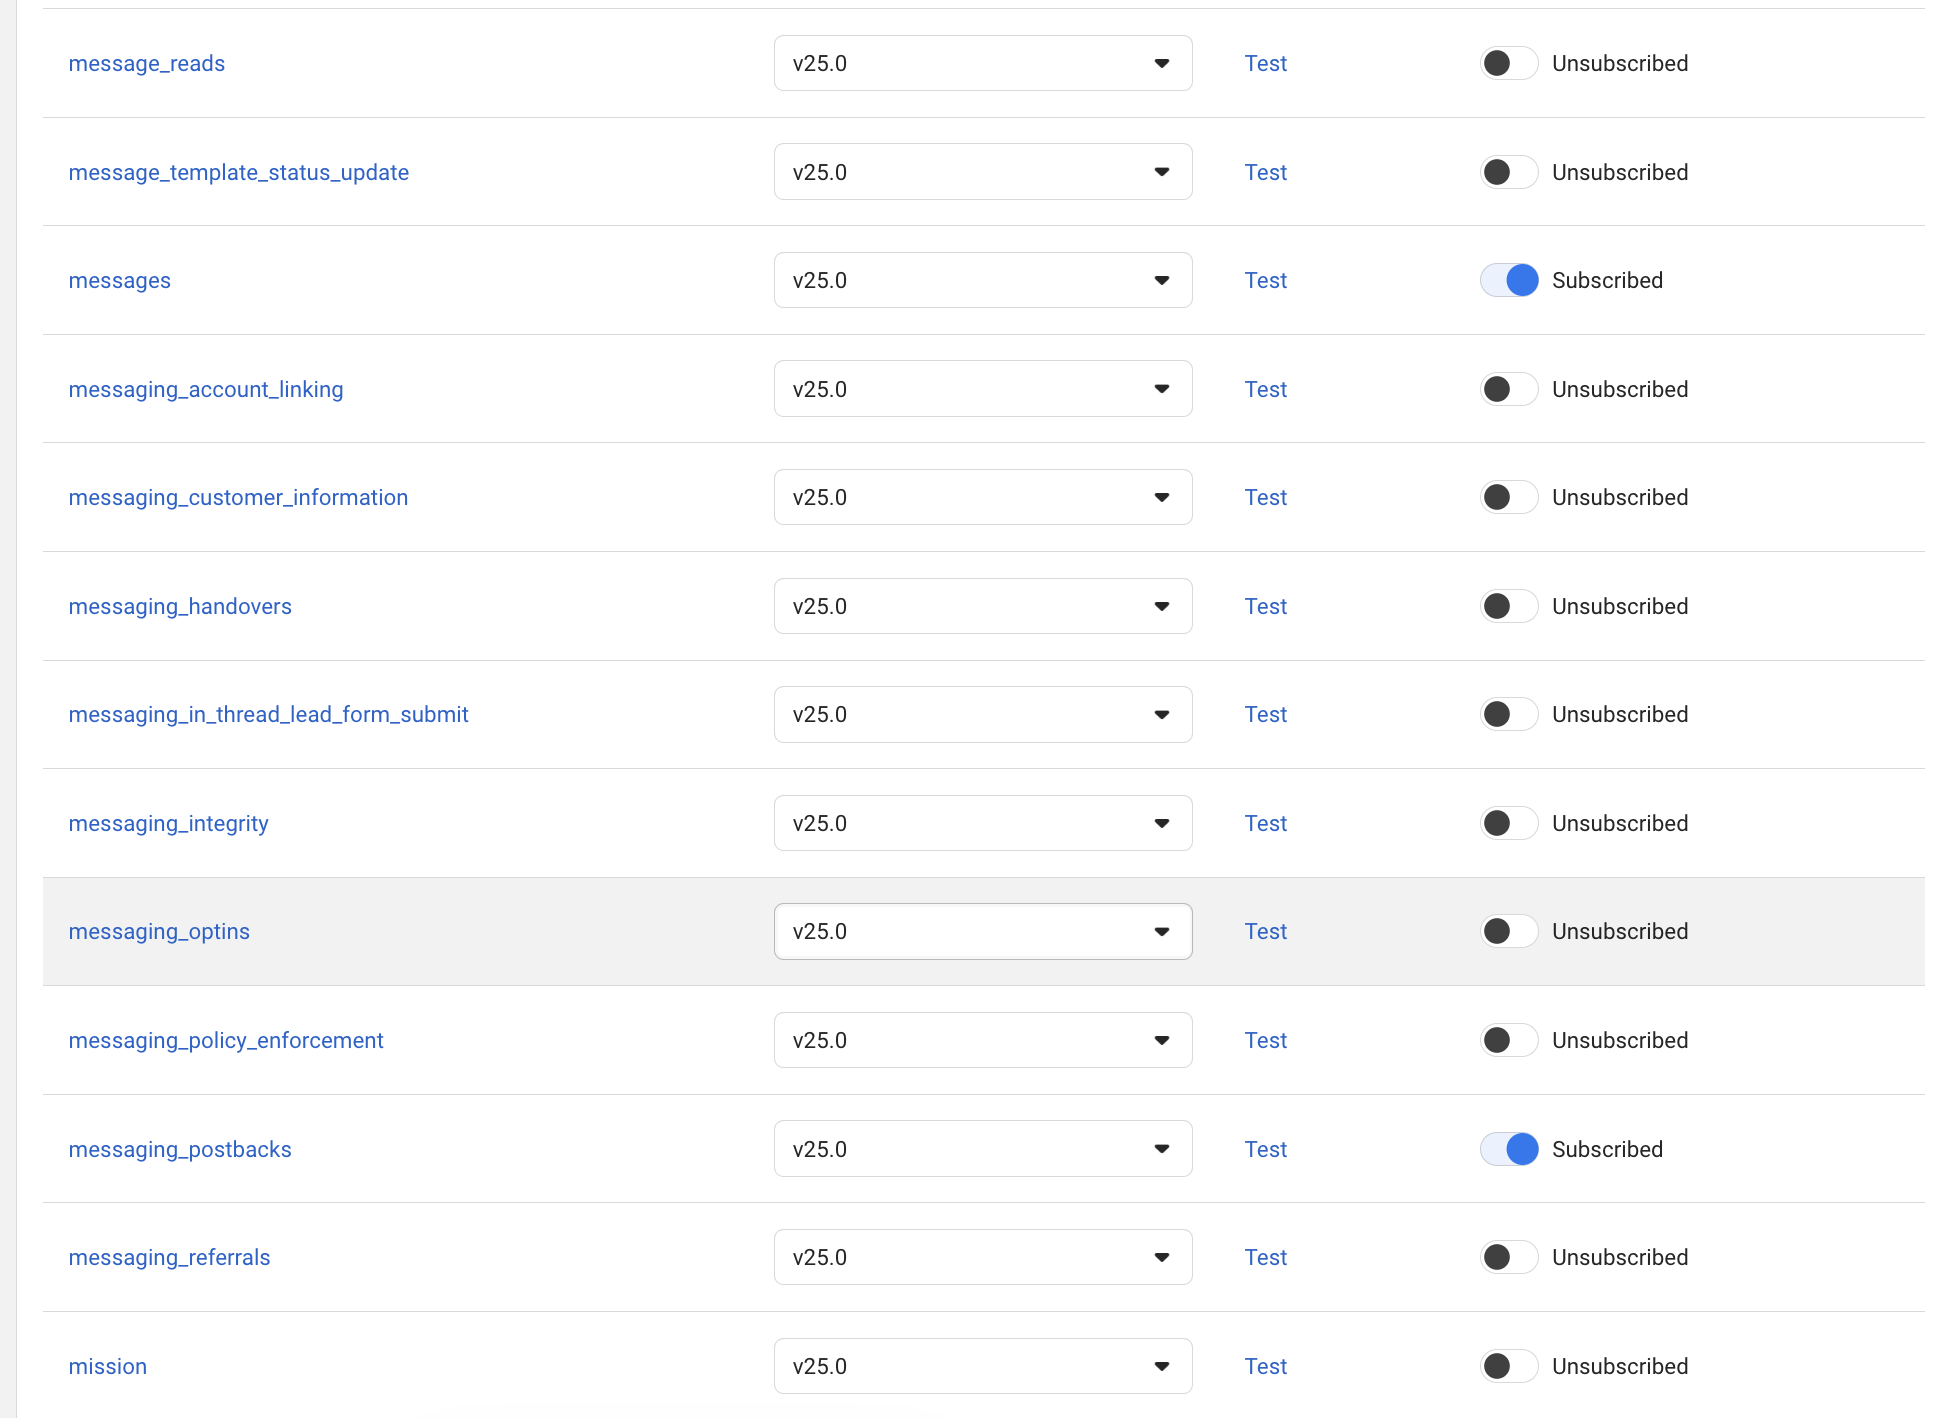
Without the messages field subscribed, your customers' messageswill never arrive at the platform even if everything else is fine. It's the step most people forget.
Part 5 · Test and go public
Test in development mode (today)
Your app in "In development" mode already works — but only with accounts that have a role in the app. To test:
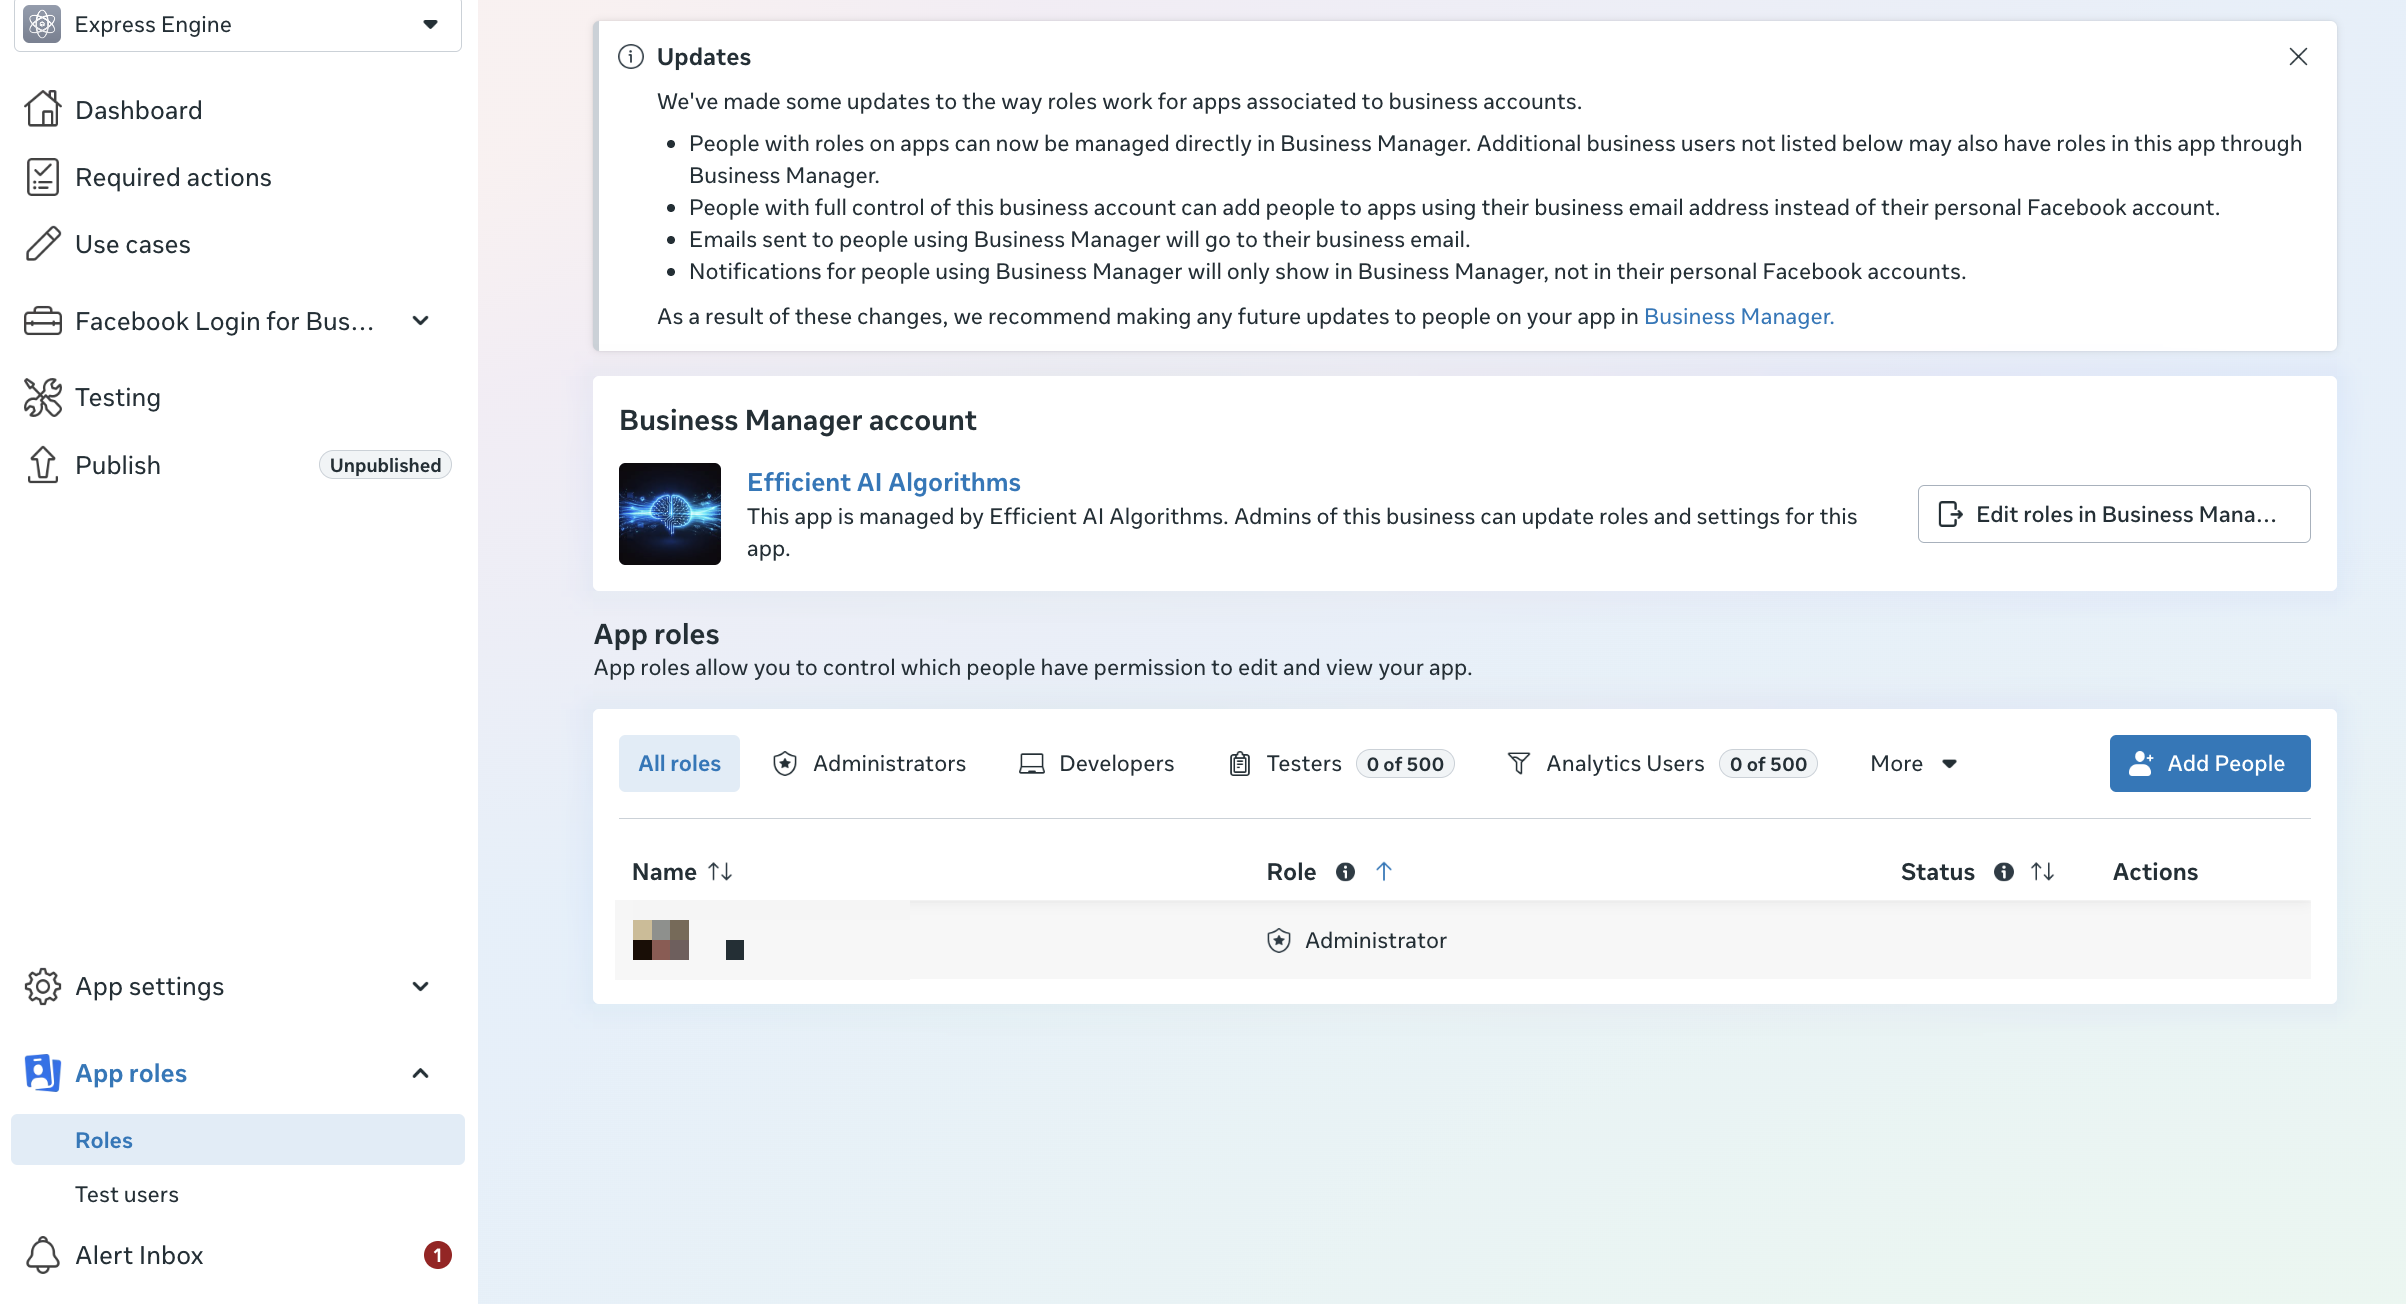
- App roles → Roles → Add People → add a second Facebook account as a Tester (a partner, a family member, your alternate account). That person must accept the invitation (it arrives at facebook.com → notifications).
- From that account, send a message to your Page (you can use the direct link
m.me/YOUR_PAGE_ID). - If your platform replies: your connection is alive. 🎉
Go public (when you're ready)
So that anyone (without a role in your app) can message your bot:
- Complete the Privacy Policy URL and Terms of Service URLin App settings → Basic (they must be real pages of yours, not placeholders).
- Request the
pages_messagingpermission via App Review(Meta asks for a short video showing how your bot works). - Verify your business in Business Manager if Meta requests it.
- Switch the app to Live (the "Publish" / mode toggle).
This process takes from days to a few weeks depending on Meta. In the meantime, your bot already works with the test accounts.
The finish: your bot replying
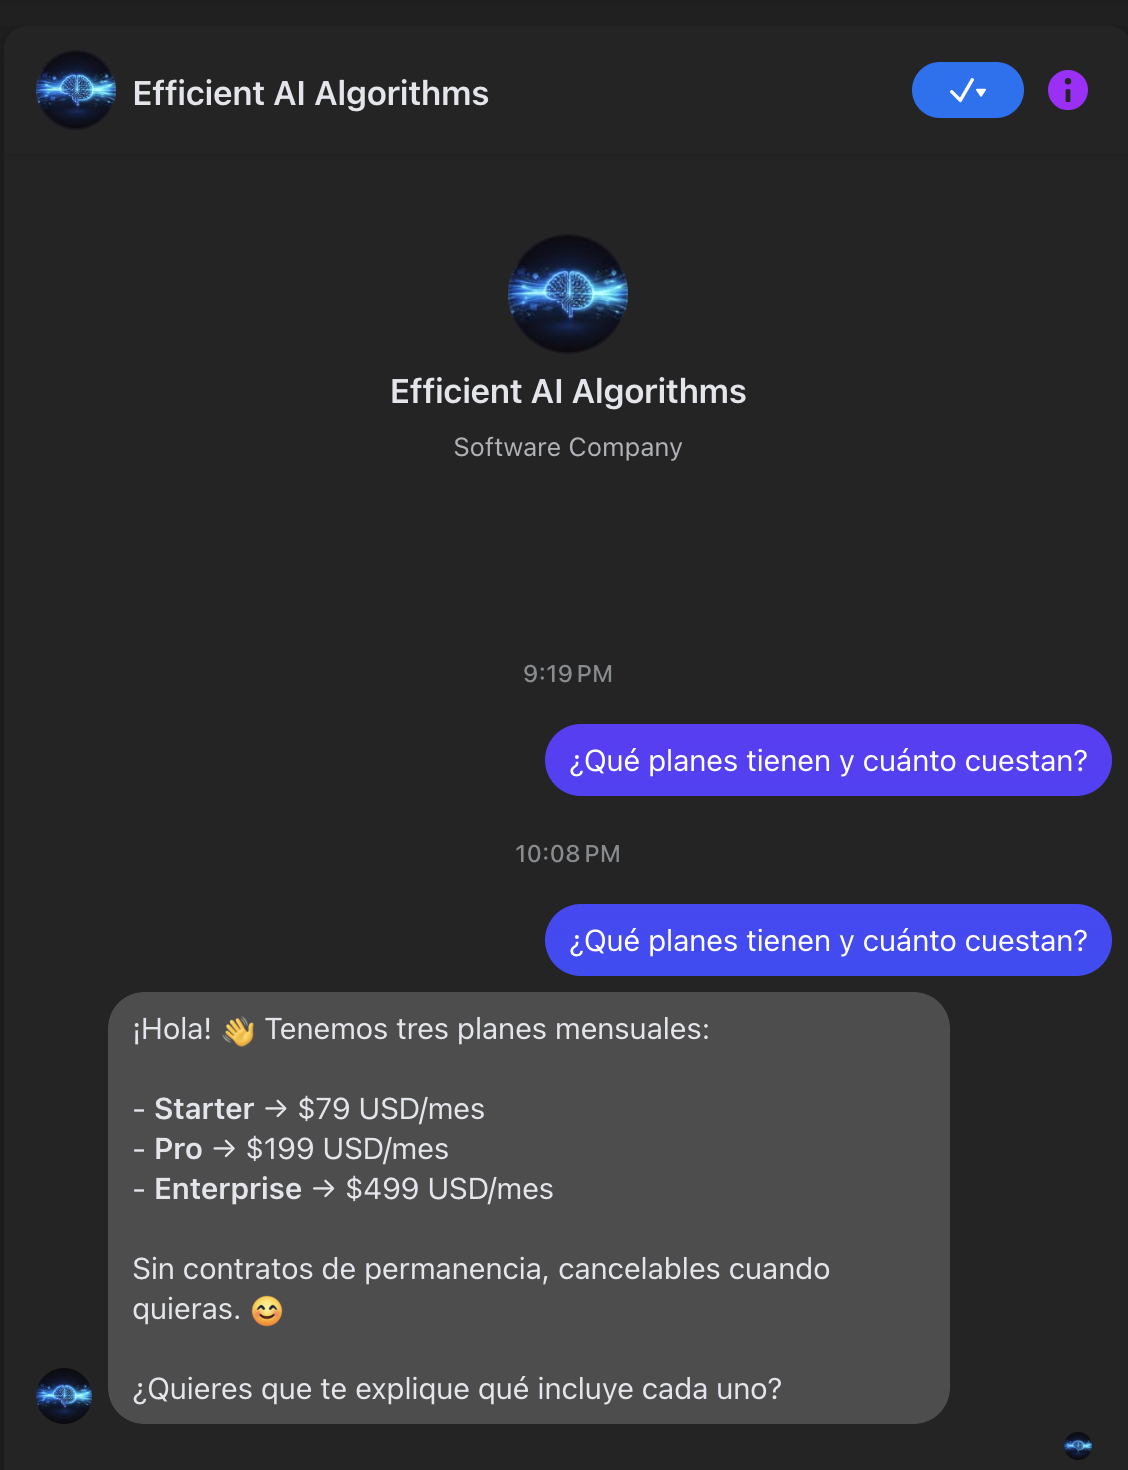
When the whole loop is green, the definitive test is a real message. We sent to the page: "What plans do you have and how much do they cost?" — and in seconds the bot's reply arrived with the full catalog, the prices and a follow-up question. That's the standard of success: not a valid token or a green check, buta real conversation working.
1-minute summary
| Step | Where | Result |
|---|---|---|
| Create Business app | developers.facebook.com → Create App | Your app "In development" |
| Add Messenger | Dashboard → Messenger use case | Messenger API Settings |
| Connect Page | "2. Generate access tokens" → Connect | Page with ✓ (watch: popups + Full access) |
| Generate token | Generate button next to your page | Page Access Token (verify it: Type=Page) |
| App Secret | App settings → Basic → Show | App Secret |
| Page ID | Next to your page / Page settings | Page ID (not secret) |
| Webhook | Messenger → Webhooks | Callback + Verify + messages field |
| Test | Tester with role + m.me/PAGE_ID | Bot replying 🎉 |
Verified: Jul 2026, Meta interface v25.0. Meta's interface changes frequently: if a screen doesn't match exactly, look for the same labels in the equivalent section.
Addendum to Guide A · 2-step connection from the panel
Replaces the manual webhook with the panel flow · ~5 minutes · Breaks the "chicken and egg" problem
Who this is for: you already followed Guide A (or the Instagram / WhatsApp Cloud one) and you have your credentials. Instead of configuring the webhook by hand (PART 4 of Guide A), your panel does it in 2 steps. This addendum replaces that part.
The problem it solves: Meta requires a webhook that already answers to let you subscribe to messages; but you don't have the link yet until you connect. It's a circle. The panel breaks it: first it gives you the link (without asking for credentials), and then you connect.
STEP 1 · Generate your Callback URL + Verify Token (no credentials yet)
- Go to your panel → Connect channel (or the
/connectpage). - Choose what you're going to connect: Messenger (Page), Instagram, or WhatsApp.
- Click "Generate Callback URL + Verify Token".
- The panel shows you two values. Copy them:
- Callback URL (a long link, unique to you).
- Verify Token (a random string).
You don't need the App Secret or the token yet. This step only creates your webhook link, ready to paste in Meta.
STEP 2 · Paste the webhook in Meta and subscribe messages
- In your Meta App → the Webhooks section of the product you're connecting (Messenger / Instagram / WhatsApp).
- Paste the Callback URL and the Verify Token exactly as the panel gave them to you (no spaces).
- Verify and Save → Meta checks your link (it now answers ✓).
- In Manage / Edit subscriptions, check only the
messagesfield.
STEP 3 · Connect with your 3 credentials
Go back to the panel → same Connect channel screen → theConnect section:
- App Secret — exactly 32 hexadecimal characters.
- Access Token — your Page / Instagram / WhatsApp token.
- Object ID — Page ID, Instagram ID or Phone Number ID depending on the channel.
- Click Connect.
The panel validates your credentials against Meta and leaves the channel pending.
STEP 4 · The first message activates the channel
Send a test message to the channel (a DM, a message to your Page or to your Cloud number). The first valid message activates the channel: it goes from pendingto connected, and the assistant replies.
30-SECOND SUMMARY
| Step | Action | Where |
|---|---|---|
| 1 | Generate Callback URL + Verify Token (no credentials) | Panel → Connect |
| 2 | Paste in Meta + subscribe messages | Meta App → Webhooks |
| 3 | Connect with App Secret + Token + ID | Panel → Connect |
| 4 | Send 1 test message | The channel → activates (pending→connected) |
Golden rule
Generate the webhook once only, paste it in Meta, and don't regenerate. If something fails, regenerate and paste again the new pair.
Addendum based on the panel's real 2-step connection flow. It replaces the manual webhook configuration of Guide A; the rest of Guide A (creating the app, linking the Page, getting credentials) stays the same.